Phalakasana - Plank

FULL BODY STRENGTH
Phalakasana/Plank is a full body high return strengthening pose which doesn’t require you to hold it for very long before you start to feel the benefits and the challenge. It is often used as a benchmark pose to check core, shoulder and arm strength in a student to see if they are ready to try more challenging arm balancing poses. It quickly generates heat. It offers a mental and physical challenge and a challenge of both stamina and patience similar to our principal in yoga of effort and ease.

THE BENEFITS OF PHALAKASANA/PLANK
Phalakasana/Plank is one of the basic arm balancing poses used as a progression towards stronger arm balancing poses. It strengthens the shoulders, spine, arms, core, glutes, quads and hamstrings. As gravity presses down on your whole back body in Phalakasana/Plank your shoulders and core in particualr feel the challenge in holding the pose for any length of time. Making it a very good pose for building strength in the abdominal, the rotator cuff (SITS) and scapula stabilising muscles of the shoulders. It is an isometric pose which means the muscles are active and strengthening in a static pressing position. It also builds a strong spine, increases bone density, builds focus, heat, stamina, energy and circulation

EXPLORING PHALAKASANA/PLANK IN YOUR PRACTICE
Similar to Vasisthasana/Side Plank, when you are in Phalakasana/Plank scan from the base of your feet to the tip of your crown and remember your Tadasana/Mountain alignment cues. In Tadasana/Mountain we are pressing through the feet, hugging the hips to the midline, lengthening through all sides of the body and broadening through the collarbones. In Phalakasana/Plank we are following these exact blueprints and adding an extra level of lifting the hips against gravity with the strength of the core.

If your shoulders are not ready for Phalakasana/Plank stay with the version with the knees down and gradually build your shoulder strength. The shoulders appreciate consideration and require good stability awareness before you add a weighted challenge. If you are in the full version make sure your hips are maintaining the diagonal line from heel to tip of crown. If they are too high it will reduce your opportunity to strengthen the full body and if they are too low it will push pressure onto your lower back. Core strength is very important in this pose. If your wrists are sensitive try folding your mat over and placing your hands on the crease to lift the root of the palm up to reduce the extension in the wrists.

ALIGNMENT CUES
In this sequence you will use Cat/Cow to start the warm up process for Phalakasana/Plank. Remember to stay with the knees down version of Phalakasana/Plank if knees up is causing you any discomfort in the shoulders. You can repeat this sequence over the corse of a few months to build up towards Phalakasana/Plank.

Have a read of the tips below and either print out the sequence or save it onto your device:

  • From Adho Mukha Svanasana, inhale, reach forward and stack your shoulders over your wrists, press into all five knuckles of your hands, roll your biceps forward, shoulder blades spread outwards.

  • Press out through your heels to firm your legs, hips level to the ground, hug your outer hips to the midline. Exhale, draw your navel towards your spine, broaden through the collarbones.

  • Lengthen from your heels all the way to the tip of your crown in a diagonal line, keep your head in line with your spine, back of the neck long, gaze to the ground.

To save the images for personal use click and hold down the image until the ‘save image’ option appears; on Mac hold down ‘control’ and click the image to get the option box; on PC right click on the image to get the option box. Scroll down in the ‘option box’ and click ‘save image’.

Ruth Delahunty Yogaru

Why I practise yoga

TRUST IN THE PROCESS
Today, I am having one of those days where everything I touch seems to break, people misunderstand me, I misunderstand them and I am unjustifiably snapping at those I love. The first step for me is to notice my behaviour, the next step is onto my mat! When I feel like this, and I step on my mat, one of two things happen – either I get distracted from everything that felt big and unmanageable in my day, or I slow down my overthinking mind just enough to find a way to work through the sticky toffee of life. It is on days like this that I am profoundly grateful for the vast array of spiritual seekers who, for over 5,000 years, created and shared their love of yoga.

WHY YOGA?
Very early on in my yoga practice I noticed the immediate and the long term benefits I was feeling after I attended a yoga class. At the time I was working in a job with tight deadlines, training very hard in the gym, pushing my body beyond its limits, and frequently getting injuries. Yoga helped me recognise the benefits of balance, and investing time in slowing down, to support my sporting endeavours and manage my day to day mental wellness too. I couldn’t quite put my finger on why yoga helped, but I knew that this was the start of a lifelong relationship with my mat.

Now, when I step on my mat, I take a moment to check in with what I am bringing to the mat with me, and what the rest of my day has in store for me. I then tailor my practice to my energy levels and mood. Sometimes I have a physical goal, like increasing hip mobility, building leg strength, or boosting energy levels; and sometimes I have a mental goal, like slowing my mind down, building focus or easing anxiety. Setting an intention for my practice allows me to get the most out of my time on my mat and makes it personal to my needs. Most days I practise in the morning so I can feel the benefits for the day ahead. My day is more focused and productive when I’ve invested in self-care and given myself breathing space before my ‘to do’ list kicks in. I also love Restorative yoga in the evening to reset my nervous system and start the wind down routine. The minute I roll my mat out there is a comfort of familiarity and I feel an inner calm wash over me.

Coming to my mat to practice is my comfort blanket – it reminds me that I am perfectly imperfect, I am uniquely me. I turn to it to find grounding; keep calm in difficult situations; find space to breathe a full breath; help me make healthy choices throughout the day… and yes it definitely feels really good to move every morning before I kick into whatever the day has in store for me!

Yoga is a very adaptable practice which can easily be tailored to your ever changing needs. The more I study the science behind it, the more I realise it is helping us physically and mentally more than we realise. I have written many articles about the benefits of yoga and how to establish a practice. Have a browse of the links below:
- The benefits of a morning practice
- 10 Tips to develop a home practice
- How to build a home practice
- 10 Reasons to build a home practice
- How can my practice help me today?

EXPLORING WHY I PRACTISE YOGA IN YOUR PRACTICE
This sequence is what I am currently loving in my practice. I have added plenty of standing poses because I love the sturdy, strength and energy they give. They help me feel grounded and present in my day. I find my hips are susceptible to feeling stagnant during my day from sitting and writing for long periods of time, so I add plenty of hip mobility into my morning practice too. I love playing around with interesting and challenging transitions in my mini flows to work on my balance and proprioception. The mini flows also remind me to breathe as I link the inhale and exhale with each pose. Finally I love how the practice feels safe and contained within the four corners of my mat, but I like to use the full extent of my mat, so in some of my flows I move from the front of my mat to the back of the mat. This also keeps me alert, focused, and adds full body functional movement to my sequence.

ALIGNMENT CUES
There is no specific peak pose in my favourite flow sequence. See can you notice some of the benefits of the poses that I have picked that help me feel present, connected, grounded, safe & whole.

Have a read of the tips below and either print out the sequence or save it onto your device:

Use the breath guide in the sequence to help you link breath with movement in the flow. Inhale is indicated with a ‘+’, exhale is a ‘-”.

If there are specific poses that you would like to stay longer in, give yourself three deep breaths in those poses, and pick up the next pose with the allocated inhale or exhale as indicated by the sequence.

For a longer practice add in a Sun Salutations at the start of each mini flow or repeat each mini flow.

To save the images for personal use click and hold down the image until the ‘save image’ option appears; on Mac hold down ‘control’ and click the image to get the option box; on PC right click on the image to get the option box. Scroll down in the ‘option box’ and click ‘save image’.

Ruth Delahunty Yogaru

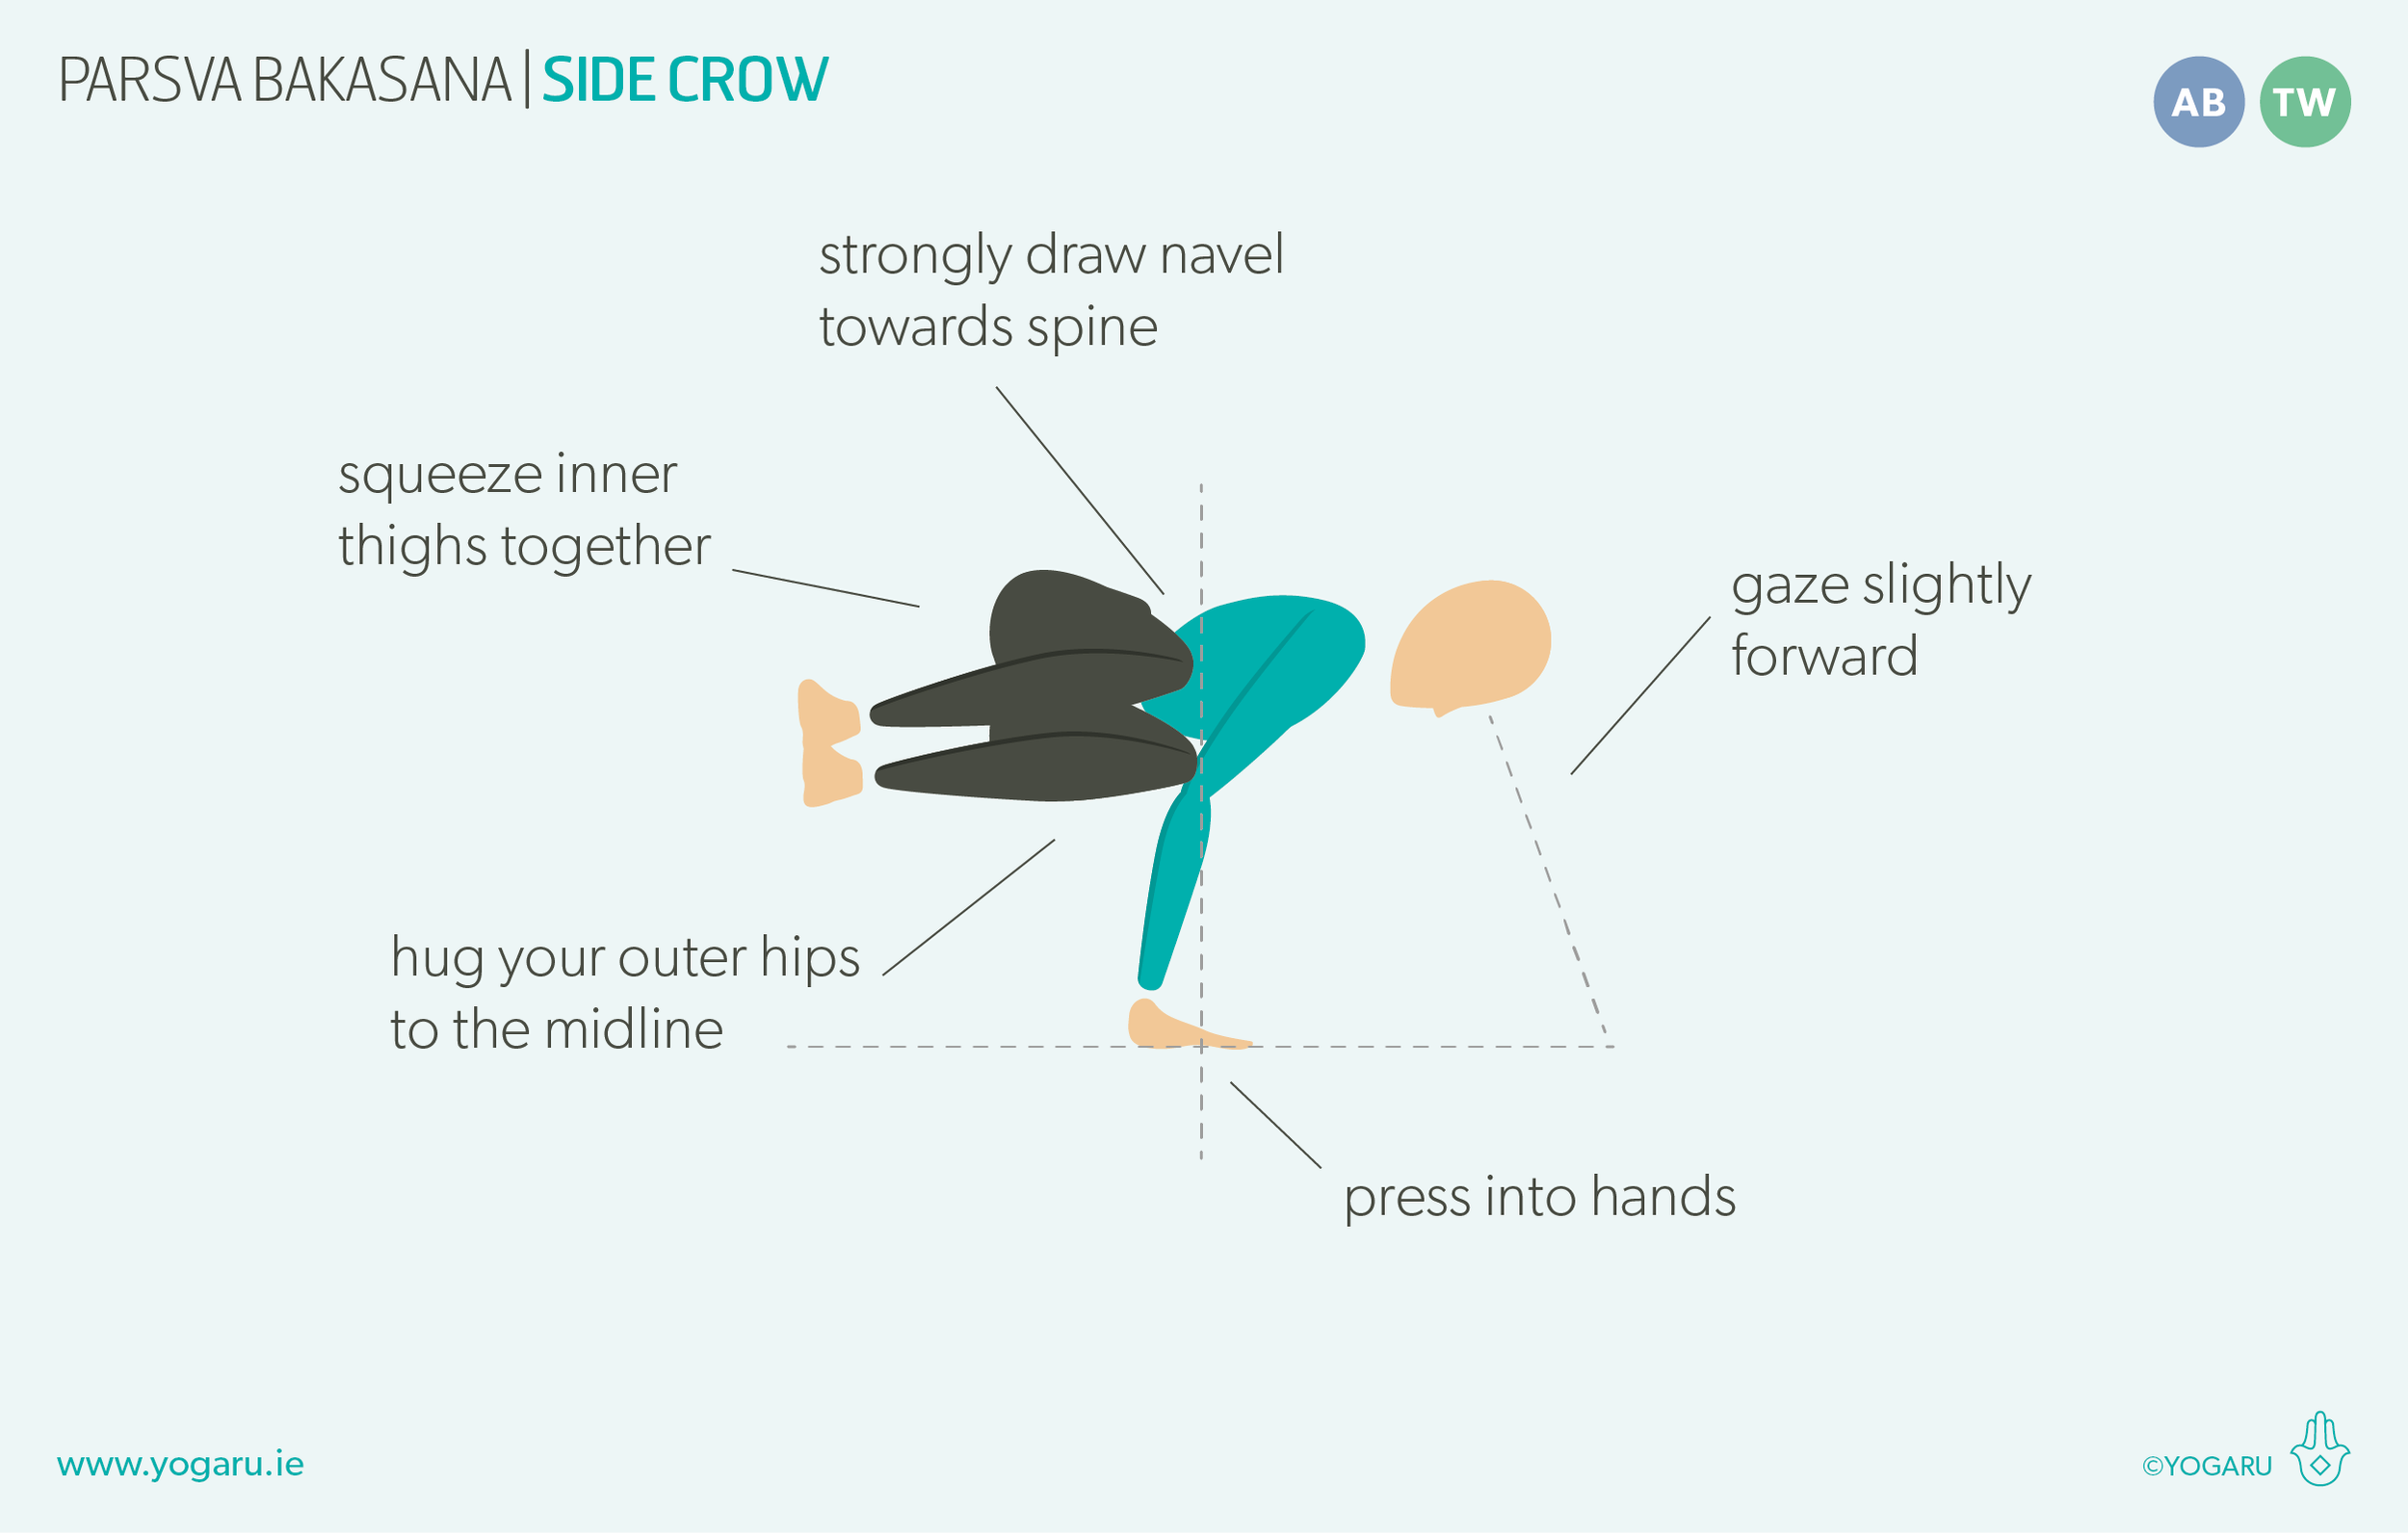
Parsva Bakasana - Side Crow

THINK LIGHT AND LIFT
In yoga there are poses with sister poses that keep the same foundation and add an upper body twist into the equation – Utkatasana & Parivrtta Utkatasana; Ashta Chandrasana & Parivrtta Ashta Chandrasana and Bakasana/Crow & Parsva Bakasana/Side Crow. If you find you are happily taking flight in Bakasana/Crow, and you are able to take a deep twist, it might be time to try Parsva Bakasana/Side Crow. Both poses are challenging arm balancing poses but you might be surprised to find that a strong core is more important than strong arms. With a strong core you can scoop your belly in to create the required curve in the spine, control your centre of gravity, and take some of the force out of the wrists. A strong core will also give a fulcrum to the pose, and a lightness to the lifting leg as you tip the weight forward, like the principle of a seesaw. 

THE BENEFITS OF PARSVA BAKASANA/SIDE CROW
Parsva Bakasana/Side Crow is a twisted, arm balancing pose. It stretches the muscles of the spine, core and glutes, and strengthens the shoulders, spine, core, hip flexors, glutes, groins and hamstrings. As an arm balance it builds heat, confidence, stamina, balance, coordination, focus, energy and strength. As a twisted pose it aids detoxification, digestion, tones the abdominal organs, boosts the immune system, circulation and eases fatigue, stress, tension and anxiety. It gives the gut a fantastic twist which makes it a great pose to practise if you find you need a bit of help to get, or keep, things moving.

EXPLORING PARSVA BAKASANA/SIDE CROW IN YOUR PRACTICE
Similar to Bakasana/Crow, if you are nervous of face planting, place a pillow or blanket on the ground in front of you. If you are not able to lift the second foot, practice lifting one foot up and hold for a few breaths. Use your strong core to play with your centre of gravity by tipping your weight forward until you feel ready to lift the legs. You might find your wrists fatigue very fast, but they also come back to life quickly too. Sit back on your heels and circle tour wrists until they feel ready to give the pose another go.

If your shoulders would benefit from some propped support you can try the first version of the peak pose in the sequence where you use a brinks under each shoulder at their highest height. Remember the bricks are not very sturdy so be sure to use your core to power the pose and the bricks up gently support the shoulders rather than take all your body weight.

ALIGNMENT CUES
This sequence warms up the spine with lots of twists and prepares the core, shoulders and arms without fatiguing them before your peak pose. 

Have a read of the tips below and either print out the sequence or save it onto your device:

  • From Malasana, step your feet together, twist to your right, place your hands on the ground to the right of your feet a little wider than shoulder width, fingers facing away from the legs.

  • Bend your elbows and place your left elbow above your right knee.

  • Strongly draw your navel towards your spine, round your upper back. Lean to your right side, shift your weight into your hands.

  • Exhale, with control, lift your feet up one at a time or both together, squeeze your inner thighs together, press into your hands, gaze slightly forward.

To save the images for personal use click and hold down the image until the ‘save image’ option appears; on Mac hold down ‘control’ and click the image to get the option box; on PC right click on the image to get the option box. Scroll down in the ‘option box’ and click ‘save image’.

Ruth Delahunty Yogaru