Myofascial release

Shoulder tension release

EMOTIONAL SHOULDERS
We often experience our emotions in our shoulders – lifting them up around our ears when we feel stressed or collapsing them forward when we’re tired – which, when done repeatedly, can lead to shoulder tension. The body and mind are intrinsically linked which means when we have mental tension it becomes physical tension and similarly if we have physical tension it can lead to mental tension. We can use this body-mind link in reverse to dissipate stress & tiredness by releasing this physical tension in the shoulders and releasing mental tension as a body mind knock on effect.

Shoulder tension doesn’t always come from our emotions. Working at a computer for extended periods compromises your posture in a chain reaction – lower spine flattens, upper chest collapses, shoulders roll forward and neck over extends. Which is why at the end of a working day the back, shoulders and neck can feel exhausted. Habitual poor posture will do a similar thing to your shoulder girdle position. If your hips are inclined to tip back, which is the more common misalignment, the lower back becomes flattened and loses its natural curve, while the upper back becomes over-rounded and pulls the shoulder forward similar to the sitting position above.

The shoulders are a complex and shallow joint with great mobility, which makes them more prone to instability than the deeper simpler hip joint. The two main bones of the joint are the arm bones (humerus) and the shoulder blades (scapula). The head of the humerus sits in a shallow socket on the side of the scapula. Both bones have movement potential in shoulder range of movement, which adds to the complexity of the shoulder joint. For example when the arm lifts out to the side into abduction, the humerus moves in the socket of the scapula on its own for the first part of the movement, then when it hits its full range and bone hits bone the scapula rotates upwards to facilitate even greater movement. If the scapula was fixed on the back of the ribs we would have very limited movement of the shoulder joint.

MFR & YOGA FOR THE SHOULDERS
If we look at the two main shoulder positions that we lean towards, shoulders lifted and shoulders collapsed forward, we can identify the muscles that are most likely to be overworking to hold the shoulder in these positions. We can then work towards releasing these muscles with MFR, or myofascial release, and yoga poses that stretch these muscles and strengthen the muscles that will bring the shoulder down and roll them back. The two main culprits for the lifted shoulders are levator scapula and the upper trapezius. When these two muscles are overfiring the neck can get compressed which can also lead to tension headaches. The main culprit for the shoulders collapsed forward is the pecs at the front of the chest. MFR not only hydrates the connective tissue, it gives immediate, but not long term, increased range of movement (ROM). Doing MFR before your yoga practice increases ROM and when followed by targeted stretching poses will incrementally capture this ROM each time you do this MFR/yoga formula. You can read more about MFR & yoga in my recent article.

EXPLORING SHOULDER TENSION RELEASE IN YOUR PRACTICE
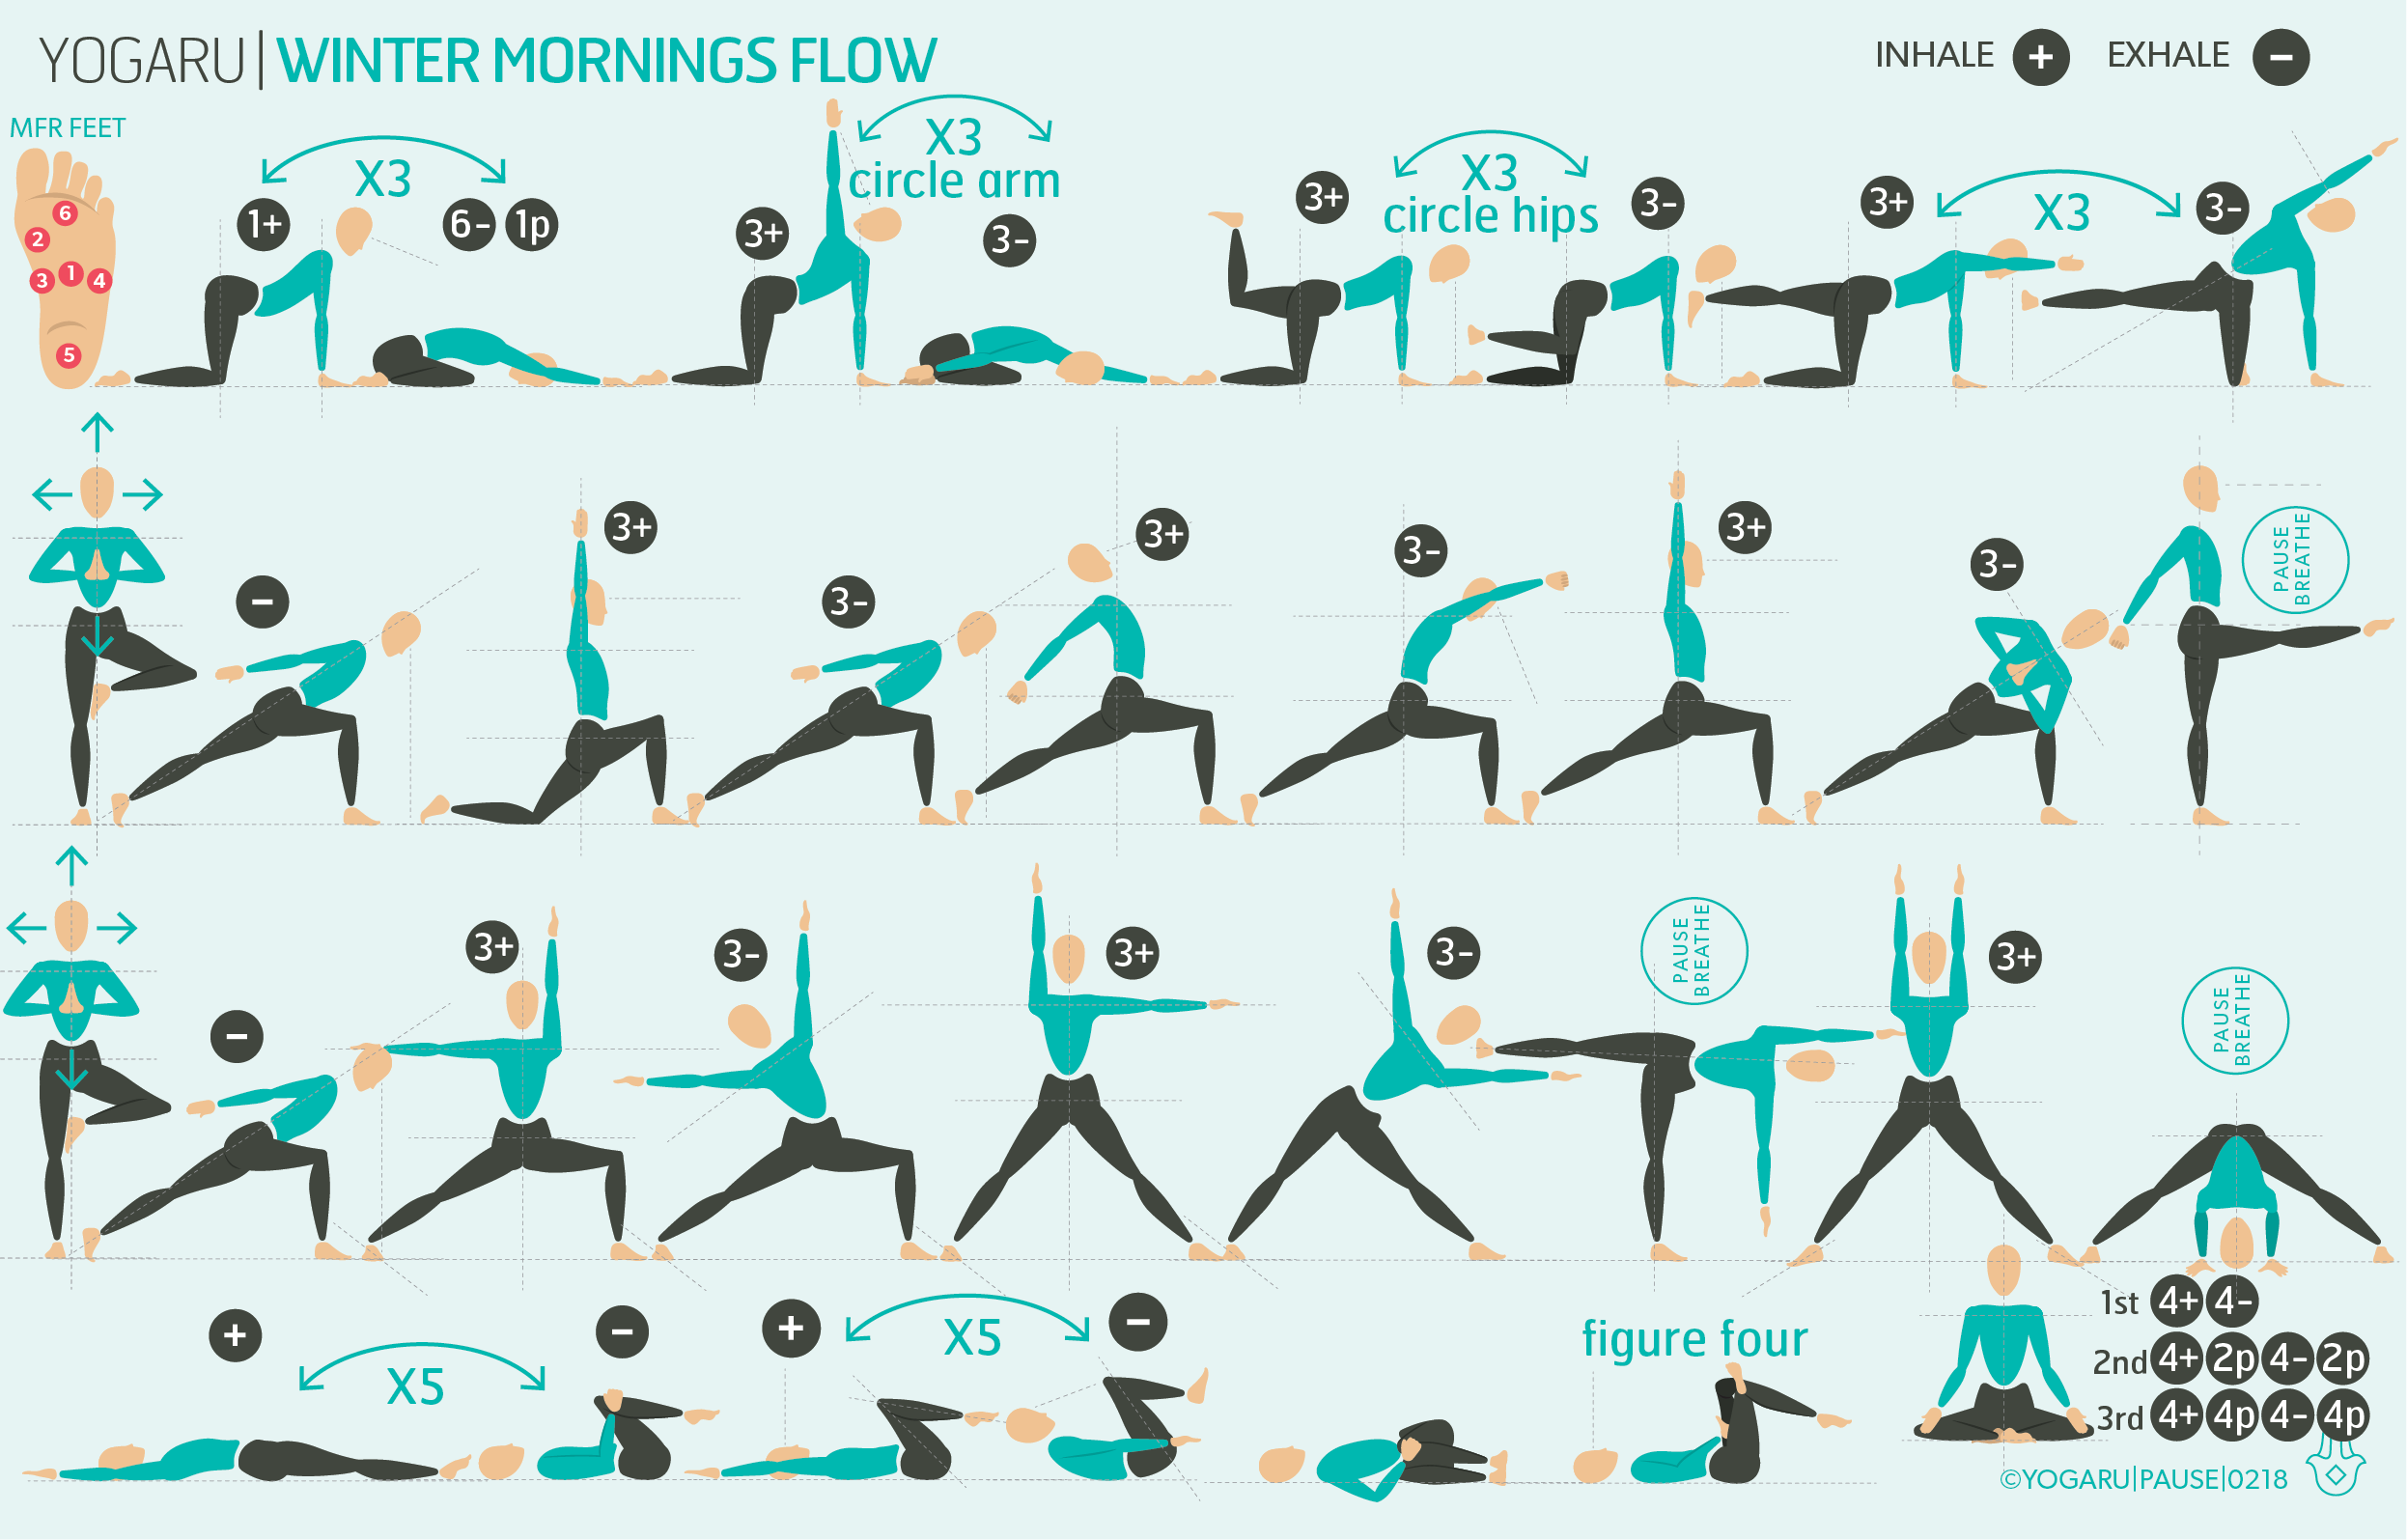
This sequence starts with MFR techniques to release the levator scapula and the upper trapezius at the back of the shoulder, pecs at the front and lats under the armpit. You will capture the increased range of movement from the MFR in the three mini flows in the first row. Focus your attention on your shoulder and look for symmetry left and right. If you find a sticky area, reduce your range of movement and stay away from pain. Don’t force your shoulder range of movement. The two standing flows will bring your shoulder into all the different directions. You might notice some directions are easier for you than others. This is very normal. We are all very individual and often asymmetrical too. You will end with some MFR on the back of the skull. This is a lovely technique that is great for relieving tension headaches associated with shoulder tension. Finally give yourself at least 5 mins to allow the shoulder to rest in Savasana after the sequence.

MFR ALIGNMENT CUES
No. 1 - Levator scapula & trapezius 
Compression - from supine with knees bent, place 2 x balls in the centre of each upper shoulder, gently press down with an inhale and release on the exhale x 5 breaths. 

Sheer - slowly circle arms overhead and back to the ground x 5.

No.2 - Pecs & lats 
Rocking - from side lying, place the brick on its mid height in the centre of the armpit. Rock your weight back and forward for the lats then pull the brick a little more forward and rock forward and back for the pecs.

No.3 - Back of skull 
Lie on your back and place a brick on its lowest high just below the curve at the back of your skull (occipital ridge). Extend your legs out, arms slightly away from your body, palms facing up. Legs slightly apart and feet fall out to the side, soften your shoulder, back of the neck long. Gently roll your head from side to side to ease out tension in the muscles at the back of the skull. Roll your head mid way to your right, pause and make small circles, repeat on the left side. Remove the brick, soften the muscles across your forehead, your temples, the back of your skull. Let the whole body become heavy and melt into the support of the ground.

ALIGNMENT CUES
Have a read of the tips below and either print out the sequence or save it onto your device:

  • Move slowly through the sequence and repeat the two standing flows for 2 or three rounds per side to get some good fluid movement in the shoulder.

  • If you are experiencing any tenderness in the shoulder, reduce your range of movement to stay out of pain.

  • Observe the movement in both the arm bone and the shoulder blade as you move through the sequence.

  • Use the breath guide in the sequence to help you link breath with movement in the flow. Inhale is indicated with a ‘+’, exhale is a ‘-”.

To save the images for personal use click and hold down the image until the ‘save image’ option appears; on Mac hold down ‘control’ and click the image to get the option box; on PC right click on the image to get the option box. Scroll down in the ‘option box’ and click ‘save image’.

Ruth Delahunty Yogaru

Posture reset

Join me for my online MFR Lower Back Love Workshop to learn techniques to support lower back health.

POSTURE STACKING
Last month I looked at lower back pain. This month's theme is a natural progression, as poor posture is the most common cause of lower back pain. Tiredness, ageing, illness, lack of exercise, asymmetry in muscle strength, chronic pain, and unresolved injuries are some of the main causes for poor posture. Good posture takes effort. It is much easier to let gravity press you down - slumped your shoulders and let your pelvis tip back when standing, sitting and moving. But the long term effects of poor posture include spine, shoulder, hip and neck pain, and make you more prone to injuries. It can even affect your breath, digestion, energy levels, confidence and mental health. 

Posture stacking checks throughout your day will build strength in your posture muscles and help them to hold you up against gravity. You can even set a reminder on your phone throughout your day to make sure hours don't go by in a slumped position. From a standing position stack - ankles, knees, hips, shoulders, head an extension of the spine. If you are inclined to jut your head forward, place your first two fingers on your chin, tuck your chin slightly and slide your head back onto your shoulders. This will create nice length in the back of the neck. From a seated position stack - hips, shoulders, head an extension of the spine, knees hip height or slightly lower, feet squared with your hips and on the ground. If, like me, your feet don't reach the ground, you can place a prop under your feet. I place a yoga brick at its lowest height under each foot, with a bit of space between them. Place your hand on your lower back and check for the natural curve of your lumbar spine. When we slump in our seats the shoulders roll forward and the pelvis tip back. This repeated poor posture will cause shoulder, lower back and neck pain if held for long periods of time. Consider taking standing breaks throughout the day too, this will bring circulation back into the hips and lower body. When you are doing your posture checks, notice if you have any areas where you hold habitual tension or gripping. Shoulders, glutes, neck, jaw, or even your expression, are common areas we hold tension. Check if you favour one foot, tilt your hips forward, back or to one side when standing or cross your legs, lean your upper body or tilt your head to one side when sitting.

5 STEPS TO GOOD POSTURE
Although types of poor posture can vary, I have focused on the most common one, which is shoulders rolled forward, flattened lower back and pelvis tilted back. The following are 5 areas to work on, if this is your inclination which are all covered in my sequence:

1. AROM (active range of movement) - adding hip, shoulder and spine movement practises into your routines will reduce mobility loss which can lead to stiffness related poor posture.

2. Strengthen the upper back (thoracic), lower back (lumbar) and the posterior shoulders - basically strengthening the whole posterior chain to prevent the front body from collapsing against the weight of gravity.

3. Strengthen the side of hips (gluteus medius) and the core (TVA, rectus abdominis) - strengthening the gluteus medius will stabilise the pelvis and prevent it from tipping sideways, while core strength will support the curves of the lower back. When the hips are weak or asymmetrical it can shift the whole posture stack.

4. Stress relief - mental stress can manifest as physical tension with muscle tension and gripping - pulling the shoulder up around ears, tension headaches or lower back pain which can all affect your posture.

5. Balance drills - the natural curves of our spine absorb impact and facilitate the ability to react, recentre and balance. Often in poor posture one or more of the natural curves of the spine are flattened or overarched throwing this delicate balancing act!

EXPLORING POSTURE RESET IN YOUR PRACTICE
Yoga does two things - it makes us more aware of our posture and builds strength in the posture muscles. The sequence starts with MFR on the feet to build a strong platform of support to create your posture awareness from. For more details on these techniques go to MFR + yoga. The first row works on strengthening the spine, core, outer hips, stretches the front of the chest and mobilises the shoulders. The start of each standing flow starts with arm extension to help stretch the front of the chest and hug the shoulder blades together on the back.The first standing flow gives into three mini flows working on side bends, twists and standing balance. In the second standing flow you are facing the side of the mat in Warrior style legs and goddess legs with lots of upper back and shoulder work. The start of the cold down has a last bit of work on the core. In this one you don’t hold on to the leg, you use your core to pull the bent knee towards your chest while also using your core to slowly lift and lower the straight leg. It finishes with a nice restorative bridge pose using a brick with a blanket over it to lift the hips. 

ALIGNMENT CUES
Have a read of the tips below and either print out the sequence or save it onto your device:

  • Move through the sequence slowly, particularly when transitioning from pose to pose.

  • This sequence is intended to be part of your posture rest routine not as a once off practice. Add it into your weekly routine.

  • Practise the full sequence once or twice a week or even better take sections of the sequence and do a little each morning to reset your posture for the day ahead.

  • Use the breath guide in the sequence to help you link breath with movement in the flow. Inhale is indicated with a ‘+’, exhale is a ‘-”.

To save the images for personal use click and hold down the image until the ‘save image’ option appears; on Mac hold down ‘control’ and click the image to get the option box; on PC right click on the image to get the option box. Scroll down in the ‘option box’ and click ‘save image’.

Ruth Delahunty Yogaru

Lower back love

Join me for my online MFR Lower Back Love Workshop to learn techniques to support lower back health.

A LOOK AT THE LOWER BACK
Back pain is one of the world's biggest health problems. 85% of people will have back pain at some stage in their lives and of these 80% is lower back pain. For many individuals it is chronic and persistent.

Understanding basic anatomy of your spine is an important part of empowering you to effectively deal with your lower back pain. The spine holds us up against gravity, houses and protects the spinal cord and allows for movement. Not only does the lower back, or lumbar spine, have to hold us up against gravity but it also has the added stress of bearing the weight of everything stacked above it. The lumbar spine is also less stable because it is ‘free floating’. The upper back, or thoracic spine, is attached to the ribs which limits its movement and makes it more stable.

Between each vertebra is a cylinder shaped disc which is filled with a jelly-like protein. Its job is to absorb impact, distribute pressure and create space between each vertebrae to allow for movement. There is a common misconception that you can get a ‘slipped disc’. The discs do not move, the top and the bottom rims of the disc are firmly attached to the vertebrae above and below it. What can happen is that the discs ruptures, where some of the jelly-like protein leeks out causing irritation to surrounding tissues, or bulge, where it pushes on surrounding nerves and cause pain. You can read more about the anatomy of the spine in my recent article Anatomy 101 - the spine.

POSTURE AWARENESS
The most common cause of lower back pain is from an accumulation of repeated poor posture or from prolonged standing or sitting. This causes weakness in the muscles, which makes them more prone to injury. Your back might suddenly ‘go’ when you lift something heavy or twist awkwardly, but it is likely that there was a weakness in the support system of the spine for much longer than you realised. Posture awareness in standing, sitting and moving throughout your day is a very effective place to start when you are working with persistent pain. Notice if you favour one hip when standing, tip your pelvis forward or back, jut your head forward, hunch your shoulders or slump them forward. Another observation exercise is to notice where you might be gripping or tensing muscles. When we have persistent pain we often go into protection mode. This will slow down or prevent the injury from completely clearing up. Take posture checks throughout the day, especially if you sit for long periods. Avoid crossing your legs, check the position of your pelvis. See can you sit up on your sit bones, lengthen through the spine to the tip of your crown, and soften your shoulders. 

EXPLORING LOWER BACK LOVE IN YOUR PRACTICE
If you are in the acute phase of lower back pain I suggest you let it settle before you try this sequence. If you are mildly symptomatic or you are going through a pain free period, this sequence will build strength where there is weakness and release areas where there is tightness. There are minimal twists, forward folds and backbends which can aggravate lower back pain. The key to lower back health is building strength in the 3 pillars of spinal support – psoas, multifidus, quadratus lumborum, with additional support from the TVA and the rectus abdomens. Core strength will also help stabilise the lower back, as long as the full 360 wrap of the core is considered, not just the front of the core. This sequence also includes MFR, or myofascial release. It is an invaluable tool for tissue hydration, circulation, pain management, releasing adhesions and injury recovery. It is also used for building healthy muscle and connective tissues, increasing the glide between the layers and relieving physical and mental tension. You can read more about the MFR in my recent article MFR + yoga.

The sequence starts with MFR on the feet to build a strong platform of support to create your posture awareness from. You will then work down the whole spine with your MFR balls. For more details on these techniques go to MFR + yoga. The second row starts with a simple leg lift. Pause before you lift your leg to take time to draw your full 360 core in towards the spine, press through the heel, and secure the spine and hip in place. The last mini flow in this row is my favourite way to strengthen the outer hip muscles. Focus on the outer hip of the standing leg hugging into the midline in this mini flow. The main job of the leg lifting is to add a weight challenge. The third row is a standing flow which focuses on slow movement to create stability and strength. In the final row you finish with a nice restorative pose with a rolled up blanket under your neck, a low folded blanket under your shoulder blades and a bolster under your knees. 

ALIGNMENT CUES
Have a read of the tips below and either print out the sequence or save it onto your device:

  • Move through the sequence slowly, particularly when transitioning from pose to pose.

  • This sequence is intended to be part of your lower back care routine not as a once off practice. Add it into your weekly routine.

  • Practise the full sequence once or twice a week or even better take sections of the sequence and do a little each morning as your daily back care routine.

  • If a pose isn’t working for you, skip it and come back to it at another time when your lower back is feeling stronger.

  • Use the breath guide in the sequence to help you link breath with movement in the flow. Inhale is indicated with a ‘+’, exhale is a ‘-”.

To save the images for personal use click and hold down the image until the ‘save image’ option appears; on Mac hold down ‘control’ and click the image to get the option box; on PC right click on the image to get the option box. Scroll down in the ‘option box’ and click ‘save image’.

Ruth Delahunty Yogaru