Sequences

Functional movement

Functional movement is the cornerstone of good everyday mobility. Guest writer Sam Delahunty shares his journey from gym bro to a more well rounded approach to wellness.

THE IMPORTANCE OF FUNCTIONAL MOVEMENT
During my years training in the gym I noticed some of the exercises were not optimal for overall body health. Yes they make you more toned and fitter looking, but do they really benefit your ability to move comfortably through life? I started to explore how our body really moves naturally and found what we call ‘functional movement’. Functional movement can be described as multi-joint, multi-planar moves which are relatable to everyday life. What is meant by multi-joint, multi-planar and every day movement? Well, multi-joint is the involvement of more than one joint during a movement, for example a squat involves your ankles, knees and hips. Functional movement often moves through multiple planes of motion as well, we’ll dive deeper into that later. Finally and most important of all, functional movement is applicable to everyday life. This is why applying functional movements to your practice is so important, as the goal of any fitness journey is to be more healthy and capable in the day to day.

WHAT IS FUNCTIONAL MOVEMENT REALLY?
There are five ‘rules’ or factors to functional movement – core, basic body movements, multi-joint, multi-planar and full active range of motion. The first one is moving from the core out. Every movement starts with the engagement of your core. This creates a solid base from which to control your limbs, for max strength and ability. Then there are the seven basic body movements. These are squat, lunge, hinge, rotation, push, pull, and gait. These essentially are the core moves your body was built to carry out, and the theory is by practising these basic movements in your training you will be more physically capable throughout life. On top of multi joint movement which I’ve explained already you move through multiple planes while practising functional moves. There are three planes through which we are capable of moving. The sagittal, dividing the body into left and right sides (moving forward and back); the coronal, dividing the body into front and back sides (moving side to side); and the transverse, dividing the body into top and bottom halves (twisting movement). Finally functional movement often aims to move your body through a full active range of motion (AROM). In our everyday lives we have become more sedentary and less versatile in our movement than our predecessors. Your body was built to move to its full capacity and as the saying goes use it or lose it. When I am building my fitness programmes I make sure to combine both functional movements and muscle or joint specific movements. Functional movements maintain and improve my mobility, and muscle or joint specific movements help prevent injury by strengthening individual muscles. Through practising yoga you often move more than one joint, move fluidly through one plane to another and challenge your core as you move. You also explore your full range of movement and you will notice many of the basic body movements cropping up in your practice too.

EXPLORING FUNCTIONAL MOVEMENT IN YOUR PRACTICE
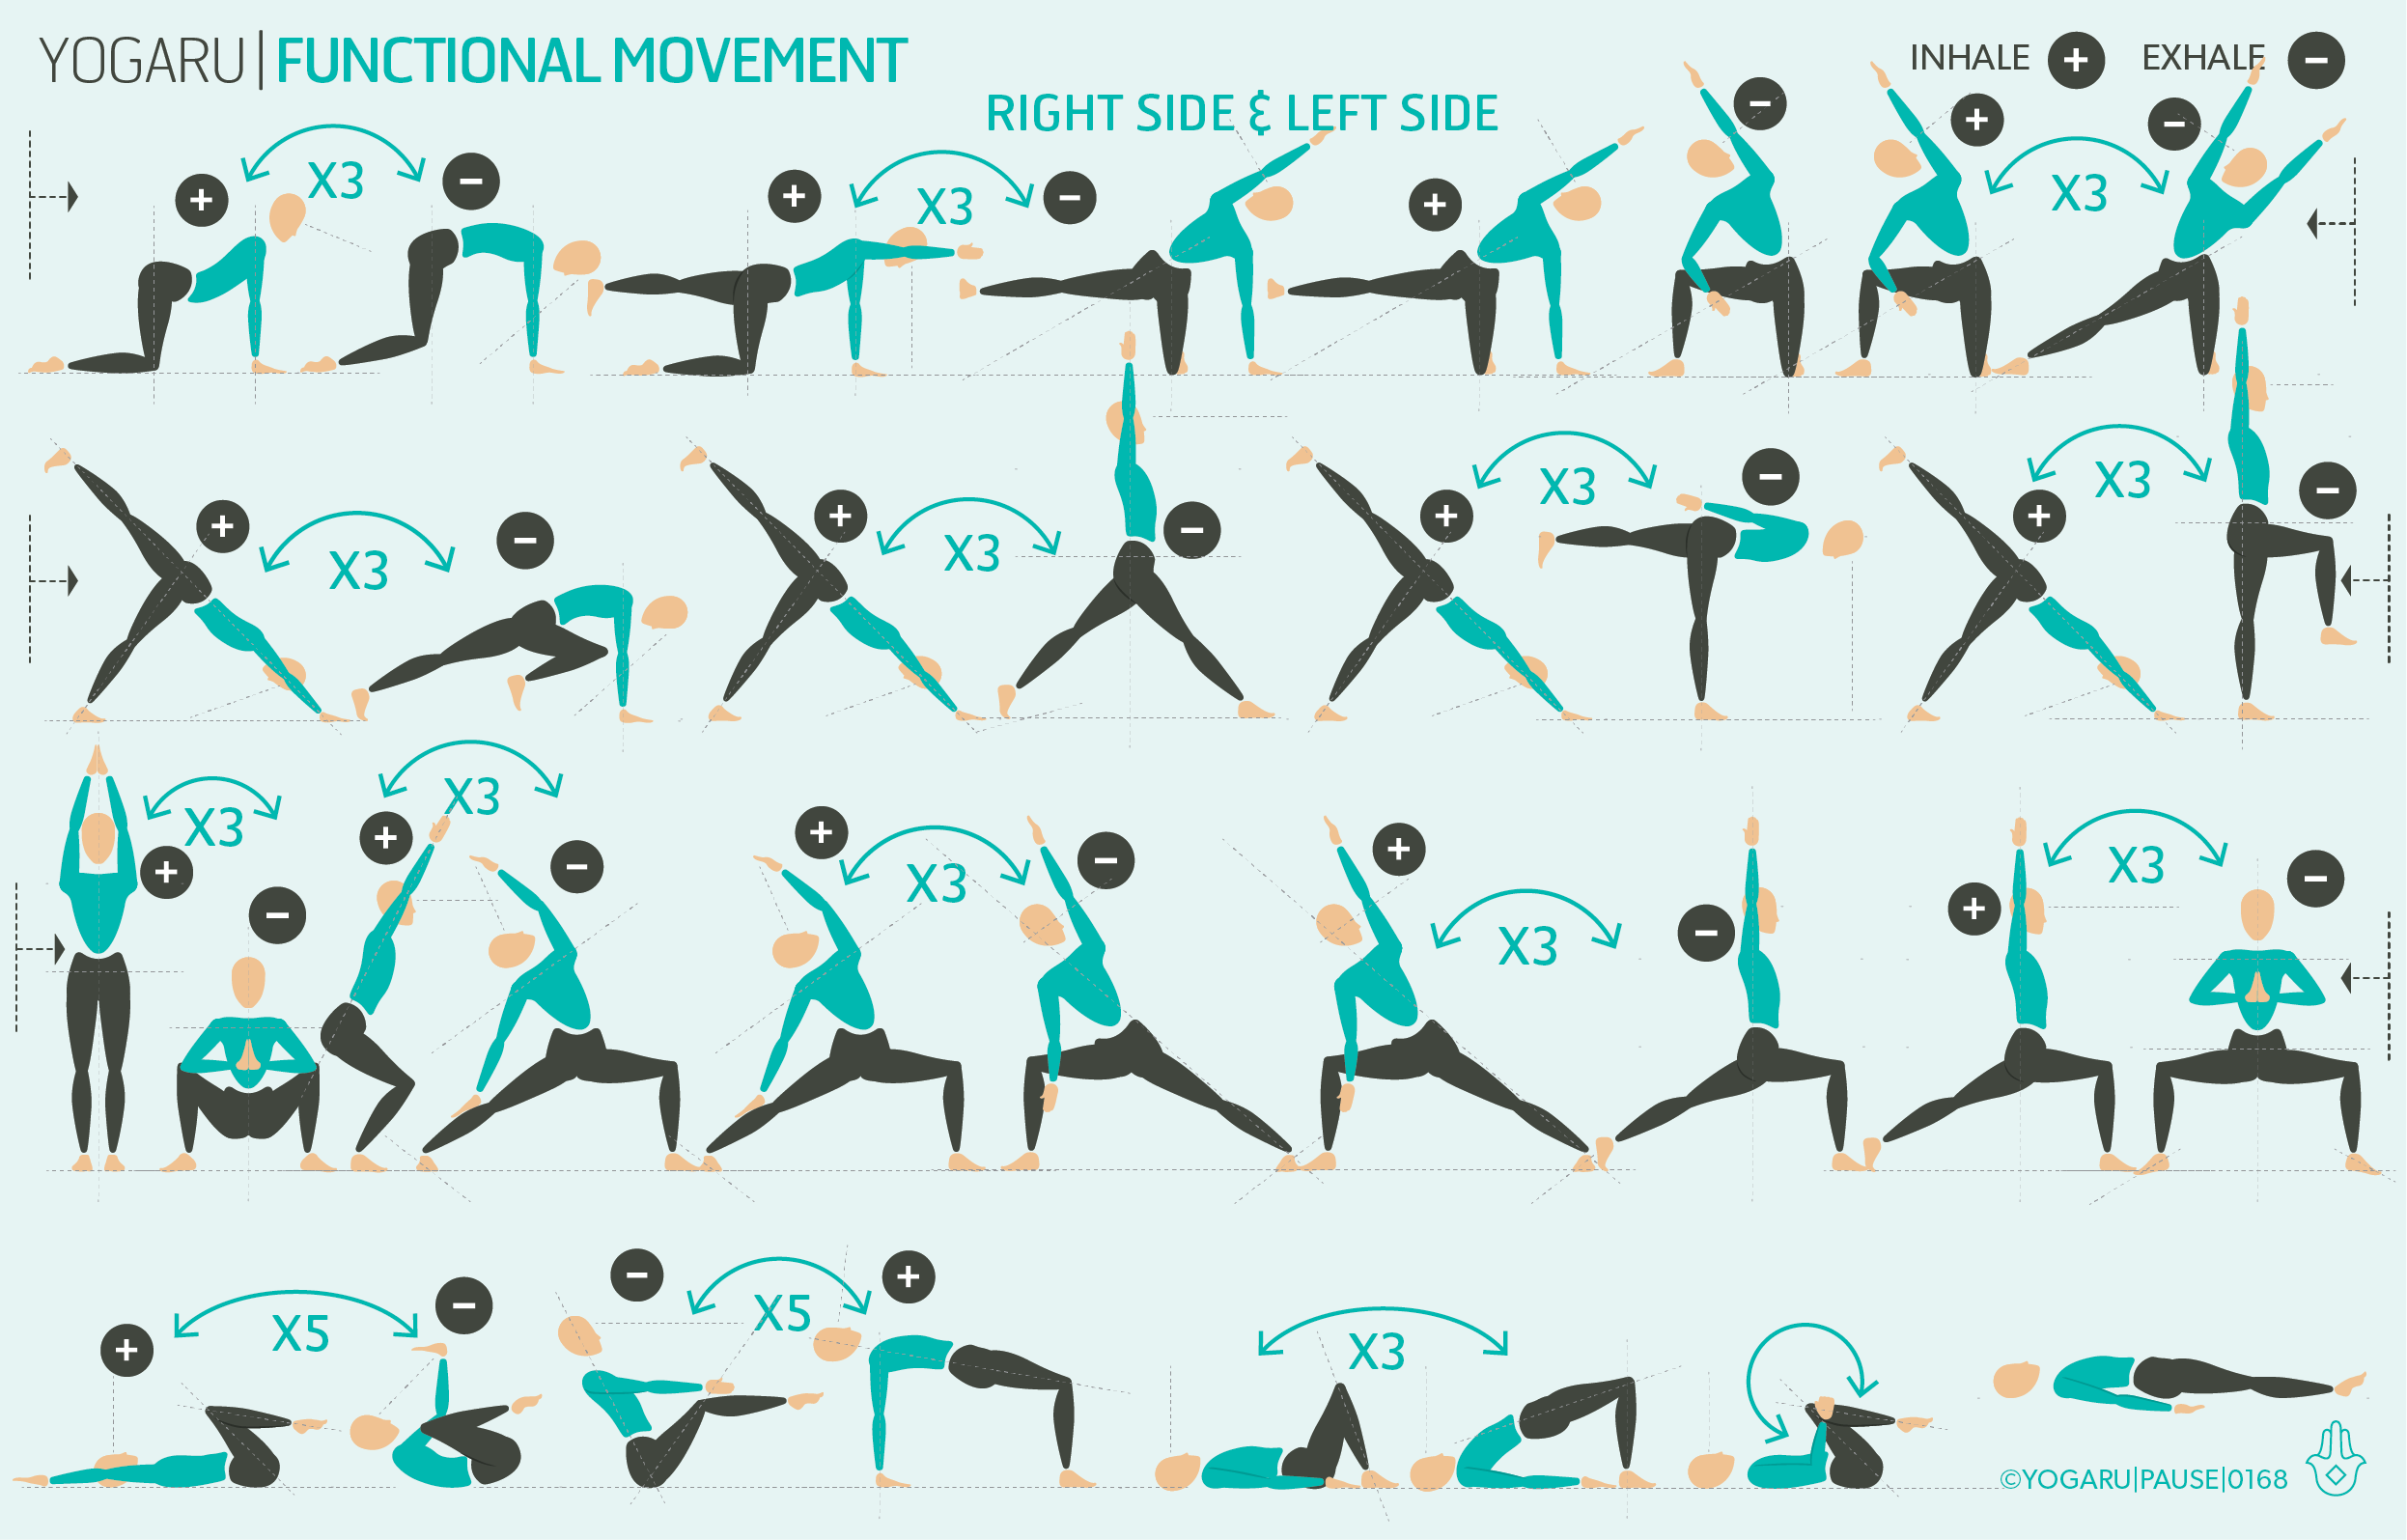
This sequence is a little different from the usual ones you will find in our articles. It is mainly built of two pose mini flows with the main focus on the transitions from pose to pose rather than the poses themselves. Creatively adding functional movement with these mini flows challenges the full body – building your repertoire of everyday mobility and longevity of the joints, muscles and connective tissue. As you practise this sequence you might feel a bit more clumsy in our movement. That is absolutely fine, remember you are building active range of movement and everyday mobility, not perfection. Remember to initiate each movement from an engaged core to stabilise our spine and help you maintain centre of gravity as you move.

ALIGNMENT CUES
There is no specific peak pose in this functional movement sequence. Use the cues below to help you flow through the sequence with ease and fluidity.

Have a read of the tips below and either print out the sequence or save it onto your device:

  • Use the breath guide in the sequence to help you link breath with movement in the flow. Inhale is indicated with a ‘+’, exhale is a ‘-”.

  • Move slowly from pose to pose. Use the first few rounds of each mini flow to work out how your body wants to transition from pose to pose.

  • For a longer practice repeat the warm up flow on the first line at the start of each of the three standing flows or repeat each of the standing mini flows three times.

To save the images for personal use click and hold down the image until the ‘save image’ option appears; on Mac hold down ‘control’ and click the image to get the option box; on PC right click on the image to get the option box. Scroll down in the ‘option box’ and click ‘save image’.


Sam’s keen interest in fitness started at an early age during his time spent playing rugby in St.Michael’s. He went on to complete an olympic triathlon at the age of 16 followed by a half marathon.

These achievements gave him the inspiration needed to set him down the health and fitness path. He learnt the importance of multidisciplinary training and incorporating yoga and functional training when creating programmes. His systematic approach to both performance and everyday health is all about building an overall ability to specialise and succeed.

Your deep core

At the centre of your core lies a muscle known as ‘the muscle of the soul’. Guest writer Sam Delahunty goes deep into the core.

THE INVISIBLE CORE
In today's fitness industry there is a strong focus on the ‘six pack’. While these are the visible muscles of the group that is ‘your core’, there are invisible, deeper and just as important muscles there as well. Deep in your body's centre there lies a muscle called the iliopsoas. Consisting of the psoas and the iliacus, this muscle plays a much larger role in your life than expected. Considered part of the posterior abdominal wall, the psoas originates in the lumbar spine, travels through the pelvis where it picks up the iliacus, and reaches right down to the femur leg bone. What makes it unique is that it is the only muscle that connects the upper and lower body. Its function is to lift the leg towards the body in flexion. A very common movement in an active life – think running, cycling, squatting, walking, core exercises and everyday movements. Because of its common use it can be very susceptible to tightness due to overuse.

THE PSOAS AND YOUR NERVOUS SYSTEM
Your nervous system has an ‘on’ switch (the sympathetic nervous system, fight or flight response) and an ‘off’ switch (the parasympathetic nervous, rest and restore response). Because of the psoas involvement in the action of running, it is one of the first responders in a fight or flight situation, making it strongly linked to the ‘on’ switch in the nervous system. When your psoas is at rest you are more inclined to be relaxed and when your psoas is tight you are more inclined to be stressed. A well adaptive nervous system fluidly shifts from ‘on’ to ‘off’ but when the psoas is tight we can get stuck ‘on’ and it sends signal to the body to constantly be prepared for fight or flight. This leads to an excess release of cortisol and adrenaline, in other words, stress hormones. This isn't all an overused psoas causes. With the upper section of the psoas attached to the lower lumbar spine, when it is tight it can pull your lumbar vertebrae forward and lead to back pain. The diaphragm and the psoas connect along the same vertebrate, meaning a tight psoas impacts your diaphragm's ability to expand fully, leading to shorter breaths and an activation of the nervous systems ‘on’ switch. The problems a tight psoas can cause is a perfect example of the importance of yoga in a balanced fitness journey. Through yoga you explore your body in a deeper way than other fitness avenues. You focus on the inner rather than the outer, and help fix and avoid problems caused in other activities, to create harmony.

EXPLORING YOUR DEEP CORE IN YOUR PRACTICE
Most of us sit for longer than our bodies were designed to, which causes the psoas to shorten and become stagnant. This sequence will help you identify and release the psoas. If you are a runner or cyclist this sequence will be of particular benefit to you. As you move through the sequence take a moment to bring your fingertips to your pointy hip bones. Actively lift them up to make sure your psoas, and assisting hip flexor muscles, are not pulling your pelvis and lumbar spine forward, causing an overarch in your lower back. The sequence finishes with a psoas release restorative pose where you lie with the back of your hips over a rolled blanket or small bolster. When you take this pose make sure that you actively draw the back of the top of your pelvis down towards the ground to make sure you are not overarching your lower back.

Getting familiar with your psoas, and adding some of the psoas releasing poses into your practice, will make it easier to avoid it getting tight and will help to manage the nervous system too.

ALIGNMENT CUES
There is no specific peak pose in this sequence. Use the cues below to help you flow through the sequence with ease and fluidity.

Have a read of the tips below and either print out the sequence or save it onto your device:

  • Use the breath guide in the sequence to help you link breath with movement in the flow. Inhale is indicated with a ‘+’, exhale is a ‘-”.

  • If there are specific poses that you would like to stay longer in, give yourself three deep breaths in those poses and pick up the next pose with the allocated inhale or exhale as indicated by the sequence.

  • For a longer practice repeat the warm up flow on the first line at the start of each of the three standing flows or repeat each of the standing mini flows three times.

To save the images for personal use click and hold down the image until the ‘save image’ option appears; on Mac hold down ‘control’ and click the image to get the option box; on PC right click on the image to get the option box. Scroll down in the ‘option box’ and click ‘save image’.


Sam’s keen interest in fitness started at an early age during his time spent playing rugby in St.Michael’s. He went on to complete an olympic triathlon at the age of 16 followed by a half marathon.

These achievements gave him the inspiration needed to set him down the health and fitness path. He learnt the importance of multidisciplinary training and incorporating yoga and functional training when creating programmes. His systematic approach to both performance and everyday health is all about building an overall ability to specialise and succeed.
Energising flow

ENERGY = FUEL
We have two main sources of fuel to energise all functions in our bodies from movement to every metabolic chemical reaction in our cells. These two sources are food and oxygen. To get these two sources into all the cells of our bodies we need to supply them with fuel in the form of good quality food as close to nature as possible and fresh air. Below I discuss what yoga tools we will use in this sequence to help build energy. But there is another very valuable tool that can be used on and off the mat to create energy. Challenging yourself brings oxygen to the brain and wakes you up. Challenging yourself on your mat can be as simple as staying an extra breath in a strong standing pose or really focusing in a standing balancing pose. Challenging yourself off your mat might mean being comfortable with occasionally stepping out of your comfort zone and trying new things, waking yourself up and not spending your days on autopilot.

HOW TO BUILD ENERGY
In our practice we can assist the two systems that are in charge of taking in food and oxygen – the digestive system and the respiratory system – and the system that helps distribute and transport it – the circulatory system.

The digestive system, or the enteric nervous system, processes food, absorbs nutrition, and removes toxins. Moving and massaging the digestive system with twists and backbends help to maximise absorption and detoxification – feeding the cells and removing toxins that will interfere with their efficient functionality. They also bring fresh blood flow to the blood vessels in the walls of the digestive system which helps the circulatory system distribute this fuel source around the whole body. Massaging the gut helps to keep you regular by encouraging peristalsis in the walls of the gut to move the waste food along. Once the body has taken what it needs from our food it is very important to remove the waste so that it doesn’t stagnate in our gut.

The respiratory system fuels our cells with oxygen so they can grow and replicate. Breathing feeds the cells and flushes out the by-product of carbon dioxide. In our practice, when we inhale our heart rate increases, the cells receive oxygen, and we feel energised. The circulatory system then takes over and helps to distribute the oxygen to our whole body. While backbends will help to expand the lungs and bring in more oxygen, the challenge of standing poses and standing balancing poses create heat and help boost circulation.

EXPLORING ENERGISING FLOW IN YOUR PRACTICE
This sequence is part of a series of sequences where I look at how yoga can help regulate our moods. Each of these sequences start with the same warm up that will move all the main joints of the body – the spine, shoulders and hips. This repetition gives you ‘comfort in familiarity’ as you can practice this series, while at the same time ensuring you are warmed up and ready for the themed mini flows that follow.

The sequence has lots of standing poses and standing balancing poses to boost circulation, expand the lungs and wake the thinking brain up. It also has plenty of poses that will massage the digestive system. Notice your energy levels before, during and after your practice. Be open to challenges and when you encounter one breath into it. .

ALIGNMENT CUES
There is no specific peak pose in this easy going flow. Use the cues below to help you flow through the sequence with ease and fluidity.

Have a read of the tips below and either print out the sequence or save it onto your device:

  • Use the breath guide in the sequence to help you link breath with movement in the flow. Inhale is indicated with a ‘+’, exhale is a ‘-”.

  • In the warm up focus your attention on the area you are warming up as indicated by the sequence.

  • If there are specific poses that you would like to stay longer in, give yourself three deep breaths in those poses and pick up the next pose with the allocated inhale or exhale as indicated by the sequence.

  • For a longer practice, linger in each of the poses of the three mini flows for the first round and then move with the breath for the second and third round.

To save the images for personal use click and hold down the image until the ‘save image’ option appears; on Mac hold down ‘control’ and click the image to get the option box; on PC right click on the image to get the option box. Scroll down in the ‘option box’ and click ‘save image’.

Ruth Delahunty Yogaru