Sequences

Shifting tension

PAUSE_0148.png

PHYSICAL & MENTAL TENSION
Tension can be felt physically and menatlly. It can show up in muscle aches, headaches or digestive issues and can also be a general sense of feeling overwhelmed, stressed or anxious. Physical tension can be caused by mental tension and similarly mental tension can cause physical tension. Prolonged periods of stress can also cause physical and mental tension to accumulate and can be shifted by regulating the nervous system. Yoga works on both physical and mental manifestations of tensions through gentle movement and conscious breathing. As we stretch and move through our practice we release tension from problem areas like the neck, shoulders, lower back, hips. The poses in our yoga practice take focus and concentration and sometimes it can be as simple as distraction is the best cure for washing away our stress, tension and anxieties. Yoga also makes us more aware of our breath, the breath is one of the most powerful tools for releasing stress and tension. The breath stimulates the vagus nerve which is the main cranial nerve associated with the parasympathetic rest and restore response. It travels to and from the brainstem straight to the throat, heart, diaphragm, stomach, kidneys, liver, pancreas, gallbladder, sphincter and reproductive organs. It is responsible for slowing heart rate and reducing blood pressure, relaxing our airways, stimulating digestion and reproductive organs, inhibiting adrenaline production, stimulating endorphin production and relaxing the muscles.

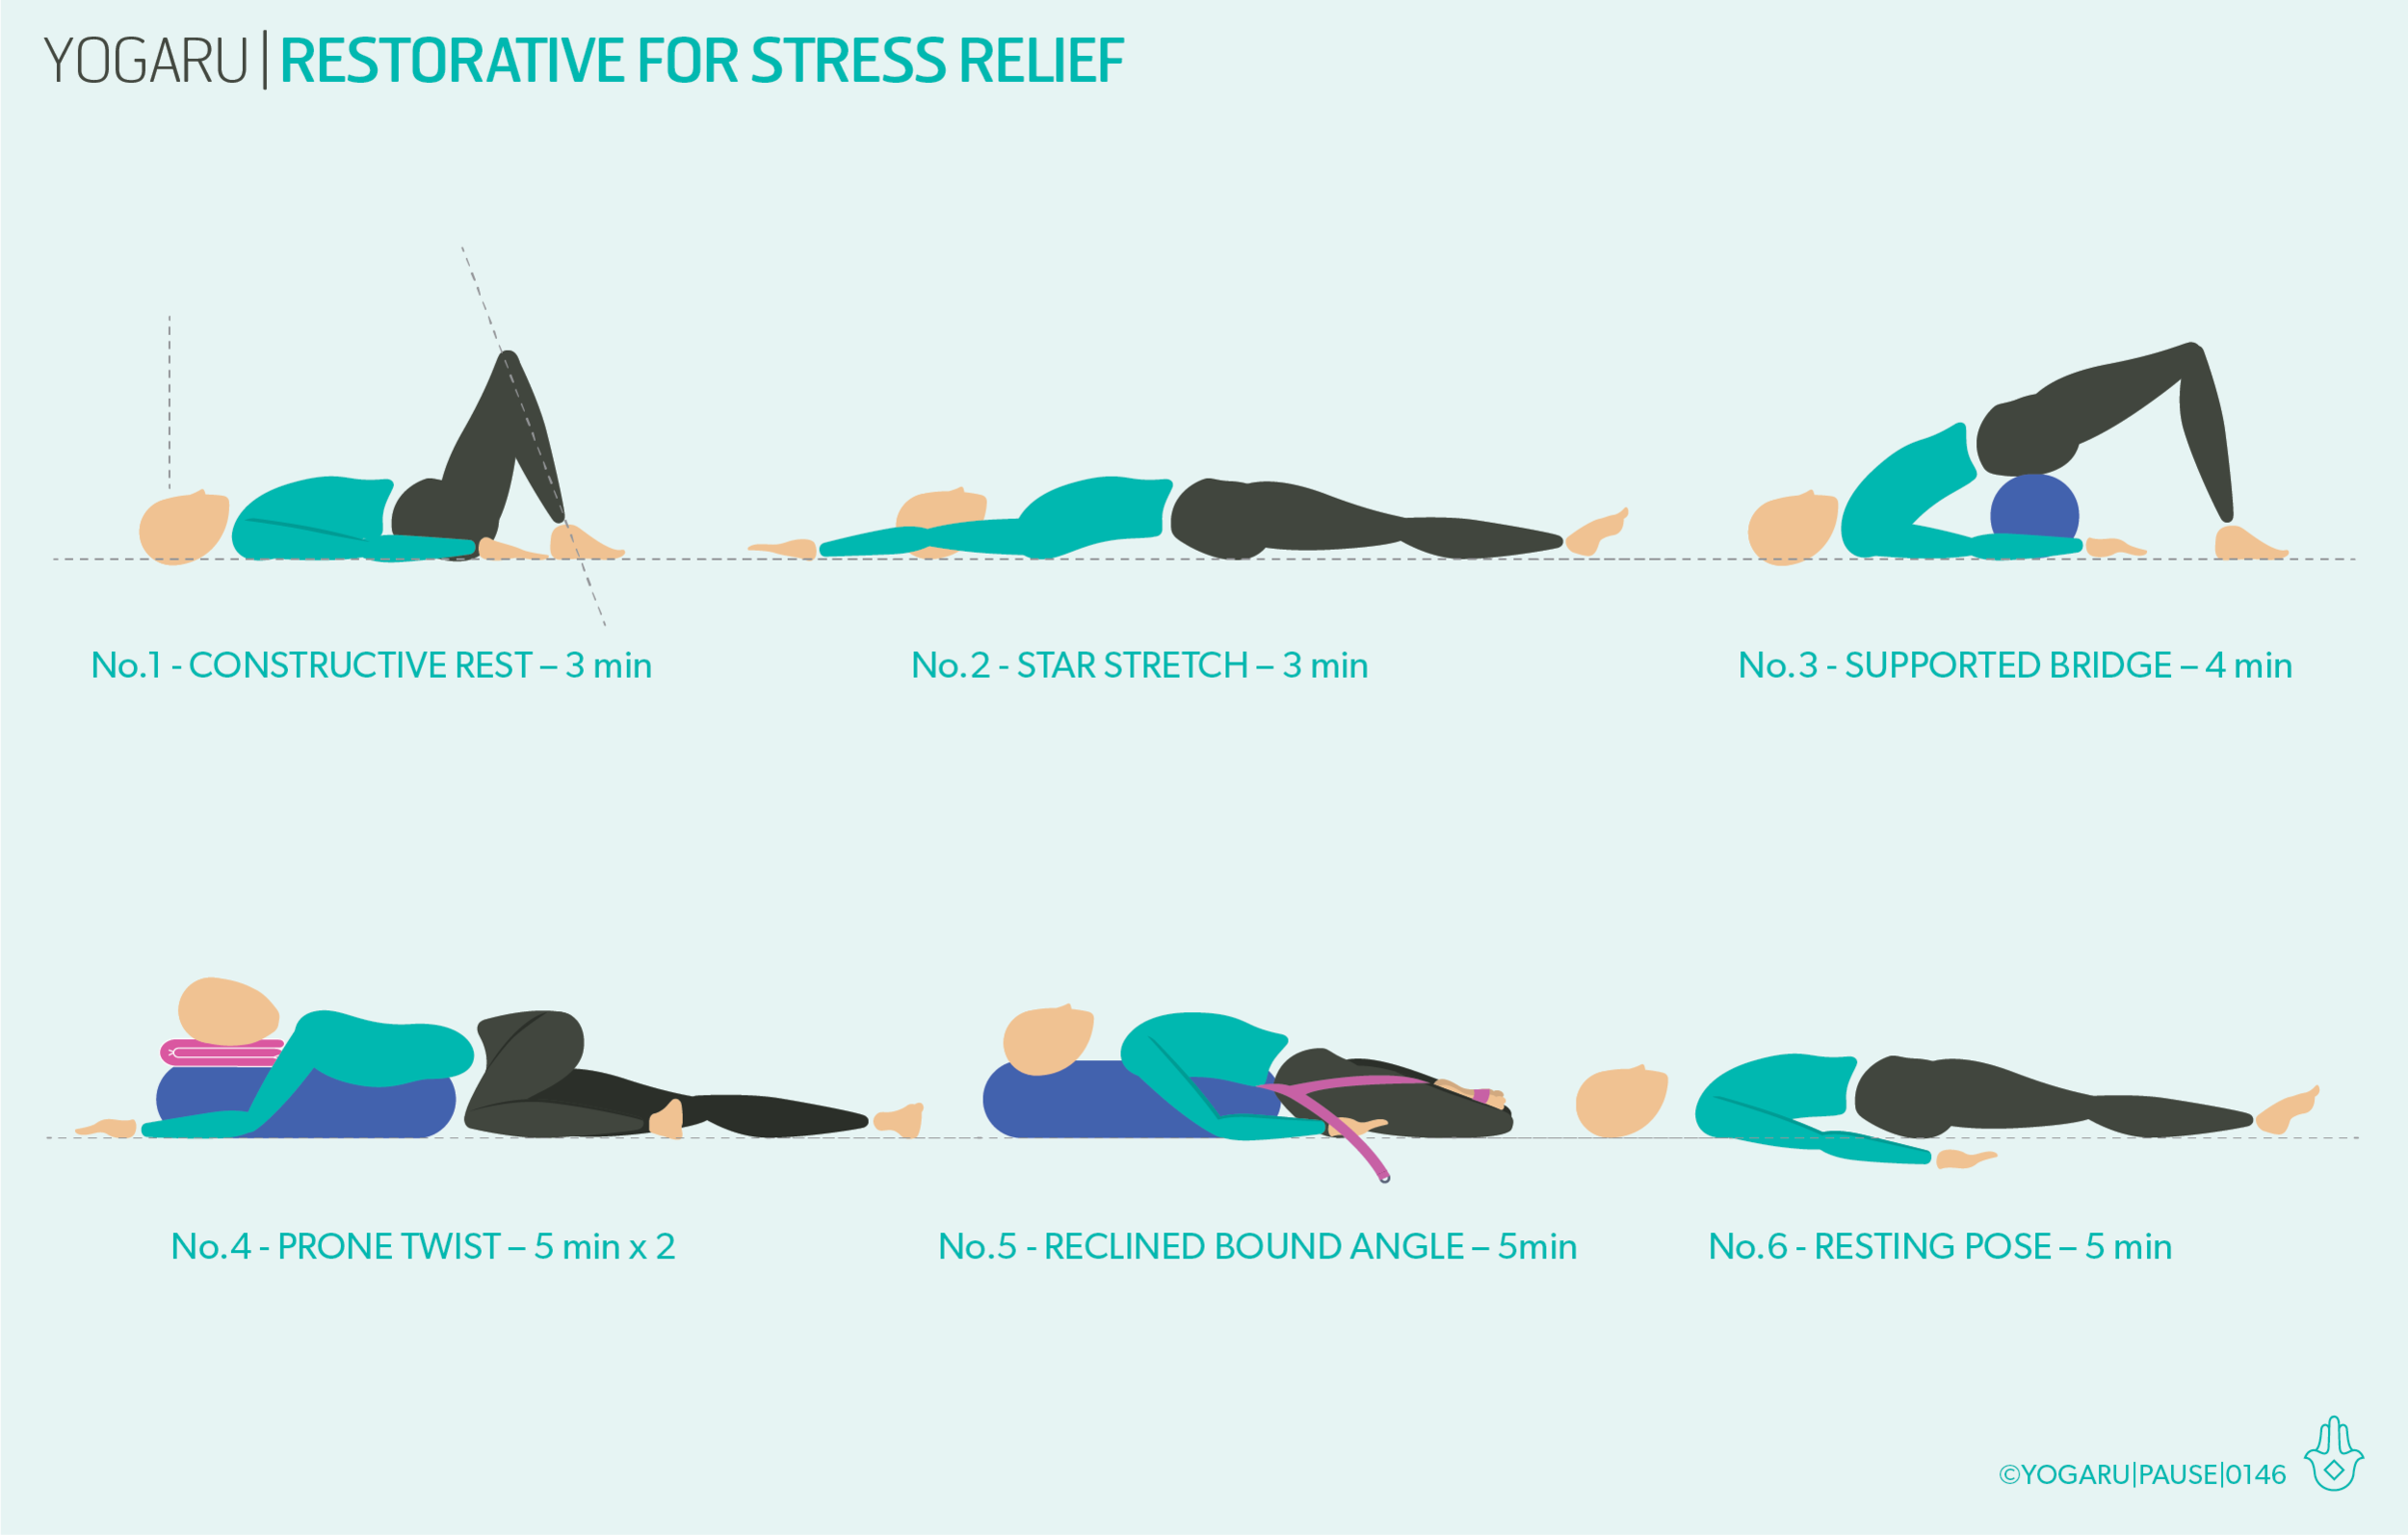
RESTORATIVE YOGA AND TENSION
Restorative yoga in particular helps to initiate the parasympathetic rest and restore response and is a direct pathway to the nervous system. The poses in restorative yoga are designed to deliberately shift you into relaxation and is considered a ‘non sleep deep rest’ or NSDR practice. NSDR are practises which are scientifically proven to give more benefits than even a good night's sleep in terms of less time required to achieve better brain and body function. Taking a restorative pose, or Savasana, at the end of your practice, teaches the body to let go of the physical challenges of the practice and cultivates a malleable nervous system ready to return to balance after a period of stress.

EXPLORING SHIFTING TENSION IN YOUR PRACTICE
The sequence starts with a gentle warm up, moves into some standing poses to shift habitual areas of tension, and finishes with two restorative poses to assimilate and optimise your chance to shift both physical and mental tension. The standing flows will target the front of the hips and the shoulders which can both be tight from prolonged periods of sitting with the pelvis tilted back and the shoulders hunched forward, or from moving throughout your day without awareness of good posture. As you move through the sequence bring your attention to the areas that you find you might habitually hold tension. Scan down through your body from the tip of your crown to your toes and see if you can root out any areas that you weren’t aware you were tensing and gripping. Pay particular attention to your neck, jaw, shoulders, lower back and hips, which are renowned areas that we all hold tension.

ALIGNMENT CUES
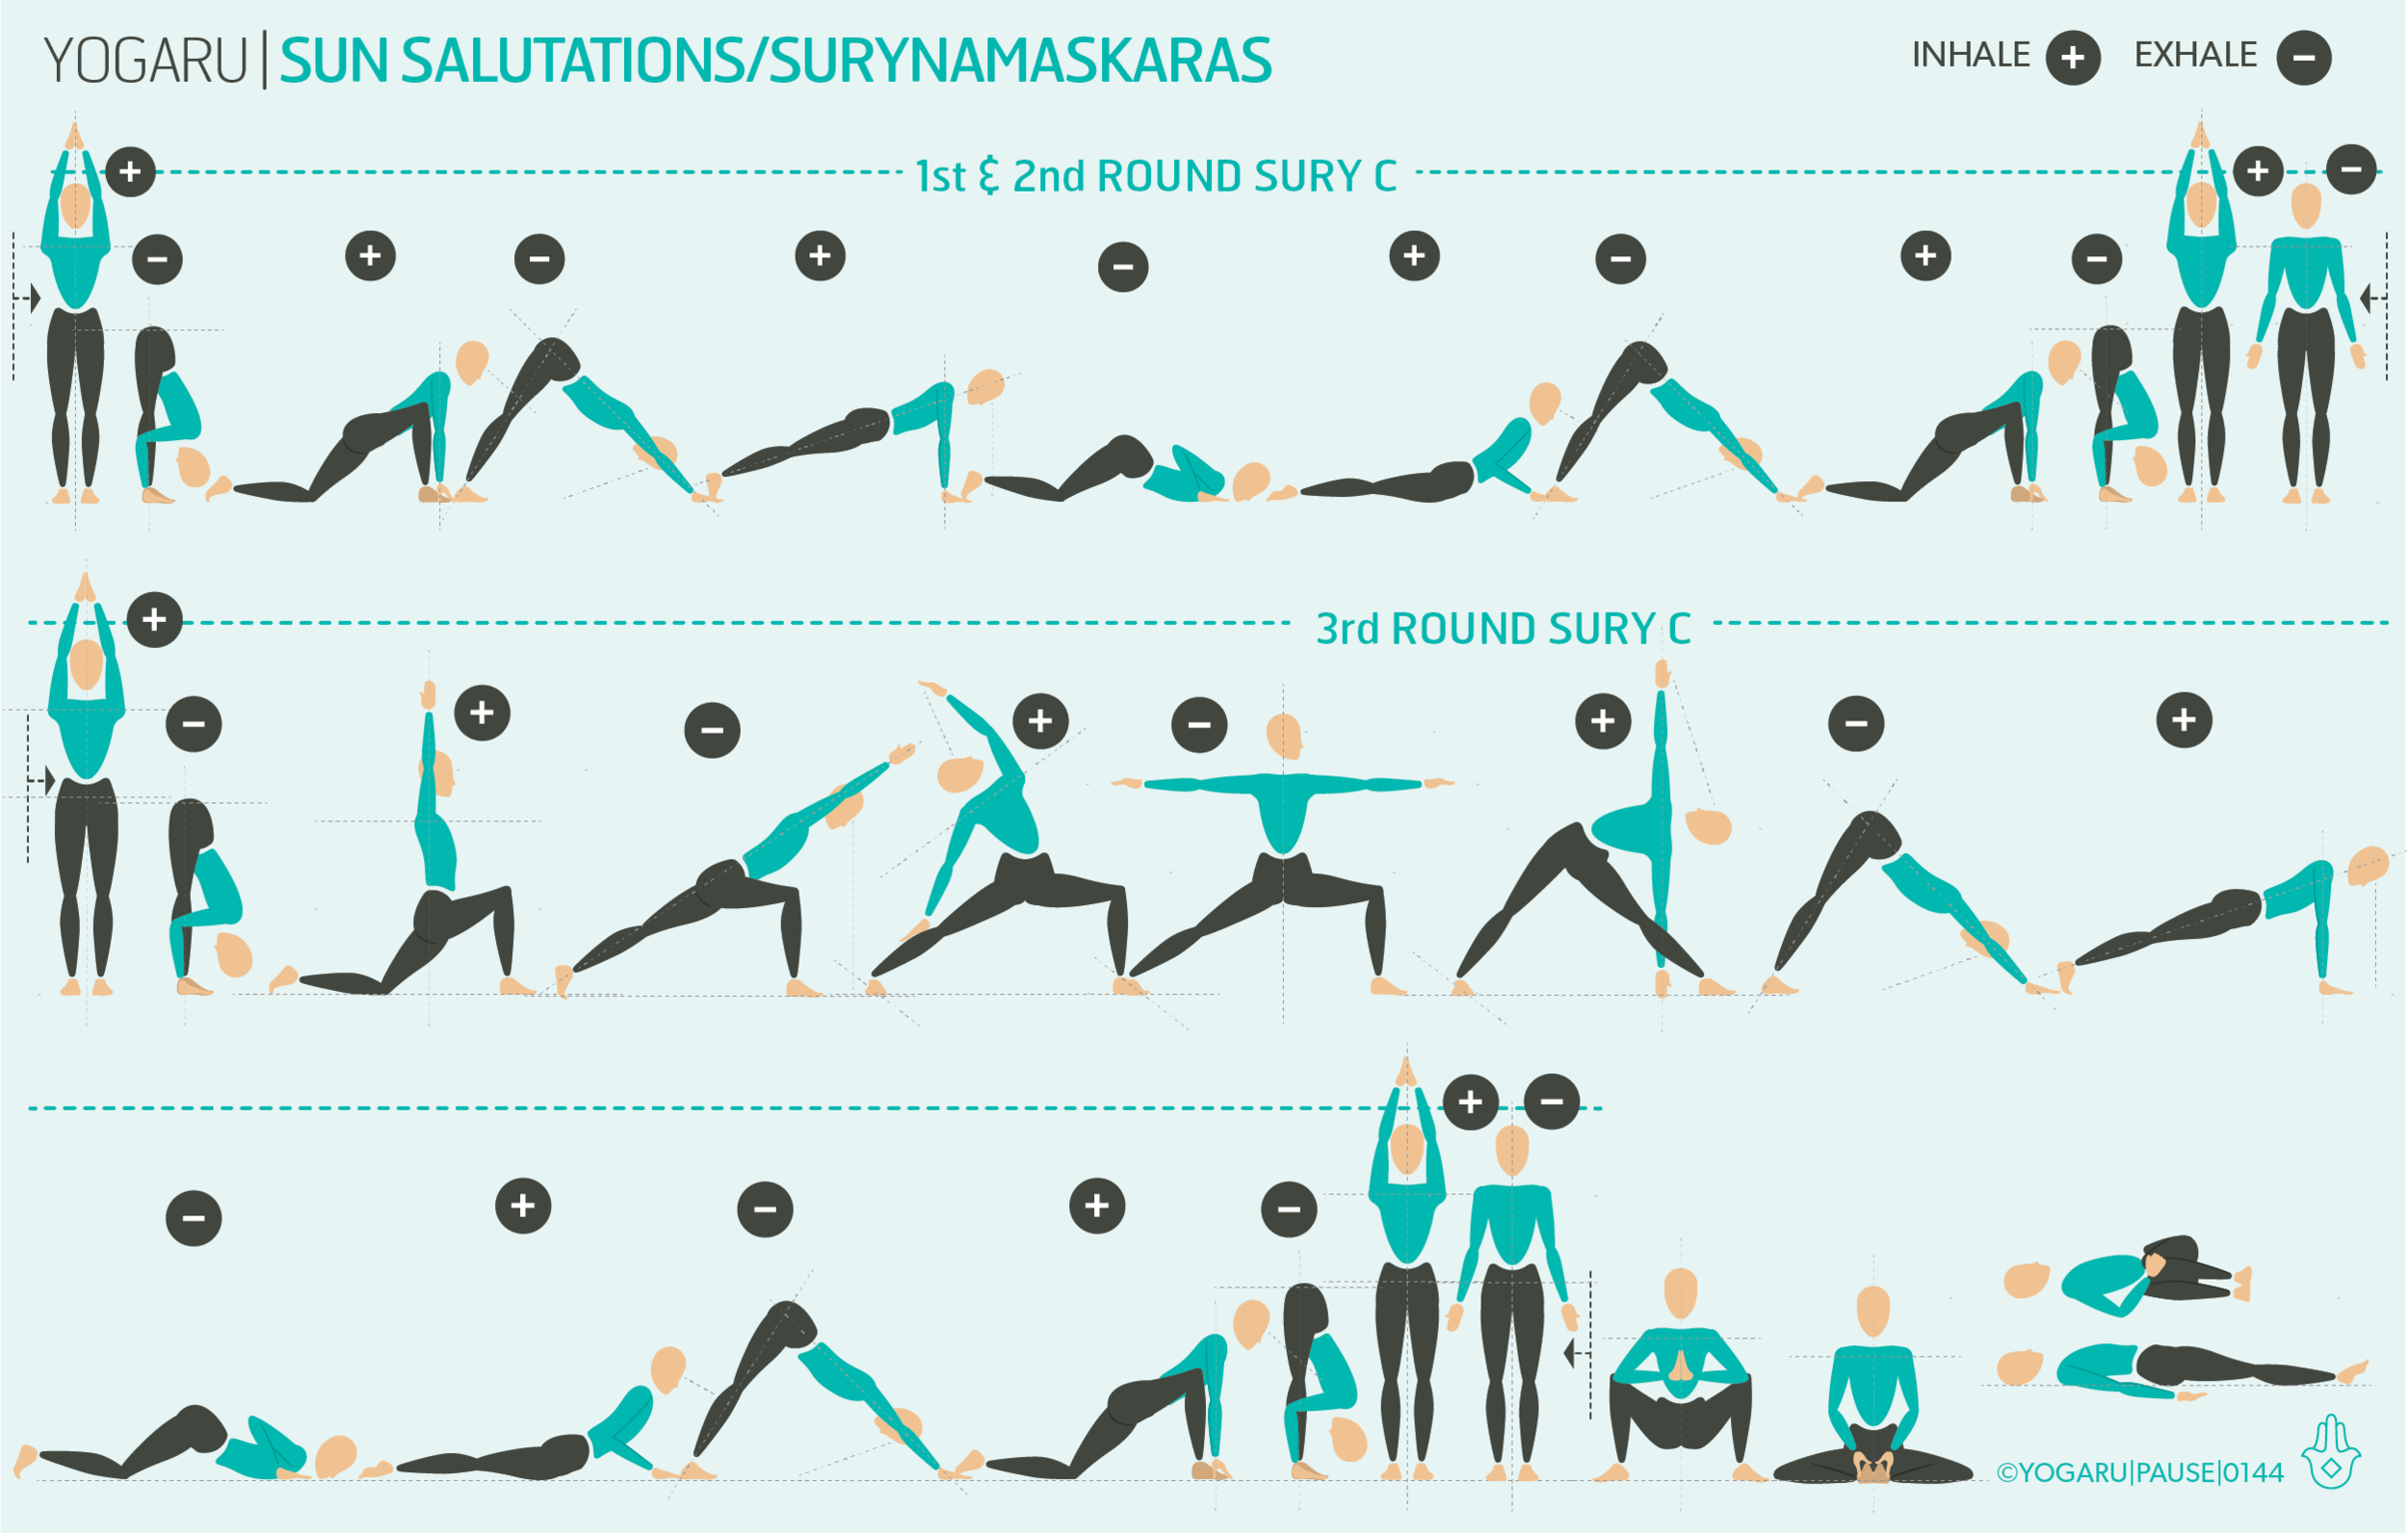
The peak pose of this sequence is Viparita Virabhadrasana/Reverse Warrior, a pose I find I am adding to my practice lots recently. It gives a lovely side stretch to realign the spine, opens the hips, inner groin, frees up the shoulder joint and encourages light core activation.

Have a read of the tips below and either print out the sequence or save it onto your device:

  • From Virabhadrasana II, inhale, turn your right palm to face up, hinge to your left from your waist, reach your right palm up and over your ear.

  • Rest your left hand on your left thigh or your lower calf, draw your navel towards your spine.

  • Lengthen through your right side body all the way to your fingertips, keep your right leg deeply bent, gaze up to your right fingertips.

To save the images for personal use click and hold down the image until the ‘save image’ option appears; on Mac hold down ‘control’ and click the image to get the option box; on PC right click on the image to get the option box. Scroll down in the ‘option box’ and click ‘save image’.

Ruth Delahunty Yogaru

Restorative for stress relief

DON'T STRESS ABOUT STRESS
Stress is not always a bad thing and has its time and place where it is an essential part of everyday life. Stress is the response of the sympathetic nervous system which makes us alert, energetic and increases cognitive function to create and get tasks done. When the nervous system is balanced we have periods of stress and periods of rest and we are able to move smoothly from one to the other. But when we tip the balance into constant, or chronic, stress we start to feel depleted. In a period of period the hormones adrenaline and cortisone are released to help us perform tasks. When the body completes the task the body clears these stress hormones out of our systems. In chronic stress we get caught in a loop, these hormones don’t get cleared out, our immune system is put under pressure and we become more susceptible to disease.

RESTORATIVE YOGA
Restorative yoga targets the parasympathetic nervous system, or the rest and restore nervous system response. Amongst its long list of benefits is that it helps relieve stress. It enhances the malleability of the nervous system – which is our capacity to move easily from activity to rest, and similarly from rest to activity – by rewiring the brain's response to stress and enhancing our ability to heal and find balance. It supports you physically, mentally and emotionally and can be used therapeutically or as a preventative measure. It is a practice of conscious relaxation which gives a deeper replenishment than even sleep and at the same time helps establish good sleep cycles. It comes under the umbrella of ‘non sleep deep rest’, or NSDR, which optimises brain and body functions.

Restorative is a practice of passive poses which consciously relaxes the body. The poses are held for longer periods of time and are supported with props to help you feel effortless comfort. In this practice we look for gentle openings rather than strong stretches. The nervous system responds better to gentle stimuli, less is more!

EXPLORING THE SEQUENCE
Anytime you feel rushed, exhausted or overwhelmed use this sequence to help you relearn how to relax and restore your nervous system. Consider the four pillars of restorative yoga when you are setting up your space – quiet, dark, safe, warmth. The body will cool down quickly so layer up and stay warm. Hold the poses for the suggested minute on the accompanying illustrated sequence. Remember to do both sides in an asymmetrical pose. Stay warm and be completely comfortable throughout your practice. Discomfort will reduce your ability to rest your nervous system. If a pose isn’t working for you just move onto the next one. Use a phone on a low volume to time your holds. As you settle into the pose, scan down from head to toe to make sure everything is happy. Use the gentle rise and fall of your breath if you find your mind wandering. Remember to take 10 minutes of resting pose at the end of your practice to let everything settle in a symmetrical pose before you reintegrate into your day.

PROPS SETUP
Props bring restorative to another level. But you don't have to have a huge array of official yoga props to get started. You can improvise with household items that can do just as good a job.

ALIGNMENT CUES
Below are the restorative techniques used in this sequence. The props you’ll need are:
1 x bolster - or 2 towels, wrapped around a horizontally rolled pillow and tied to secure.
2 x yoga bricks - or 2 two thick similar sized dictionaries.
2 x yoga blankets - or any wool, thick cotton or fleece blanket with density.

No.1 - Constructive rest
Start lying on your back, your knees bent, feet mat distant apart and knees knocked in together. Place your hands on your belly and feel the breath move through you. Take four rounds of 4/6 breath, inhaling for the count of 4 and exhaling for the count of 6. Keep the breath as gentle as possible, notice if you are holding any tension in your shoulders and upper chest. Pause after and notice any change this simple breath observation has made to your body and mind.

No.2 - Star stretch
From lying on your back reach your arms overhead and stretch your feet away in a star shape. Stretch your right arm and left foot away, hold for 3-4 deep breaths. Stretch your left arm and right foot away, hold for 3-4 breaths.

No.3 - Supported bridge
From lying on your back, lift your hips up and place the bolster horizontally under your hips. Settle your hips down onto the support of the bolster. Knees bent, feet hip distance apart. Arms in cactus position or extended either side of your body, palms facing up.

No.4 - Prone twist
Place your bolster vertically along the top centre of your mat with a folded blanket at the far end. Sit with your right hip up against the short end of the bolster. Place your hands either side of the bolster. With an inhale lengthen through the whole spine and on your exhale gently place your front spine along the length of the bolster. Place your right cheek on the folded blanket and let your arms gently hang either side of the bolster. Repeat on the left side.

No.5 - Reclined bound angle
Place your bolster vertically along the top centre of your mat with a folded blanket at the far end. Sit with the back of your hips against the short end of the bolster. Bring the soles of your feet together and let your knees drop out to the sides. Prop your legs with a brick under each thigh or use a yoga belt to secure your feet and support the legs. Gently lie back onto your bolster and place your head on the folded blanket at the top.

No.6 - Resting pose
End your practice with at least 10 minutes of Savasana or Resting Pose. Lie on your back, legs stretched out, arms slightly away from your body, palms facing up. Legs slightly apart and feet fall out to the side, soften your shoulder, back of the neck long. Gently close your eyes, let the body become heavy and melt into the support of the ground. Soften the muscles across your forehead, releasing all tension, gaze inwards. Let all the muscles and bones of your body release.

To save the images for personal use click and hold down the image until the ‘save image’ option appears; on Mac hold down ‘control’ and click the image to get the option box; on PC right click on the image to get the option box. Scroll down in the ‘option box’ and click ‘save image’.

Ruth Delahunty Yogaru

Sun salutations

This sequence is available on YouTube.

SALUTE TO THE SUN
The Sun Salutation, or Surya Namaskar in Sanskrit, is traditionally practised in the morning as a salute to the Hindu god of sun ‘Surya’. It is an energising movement meditation traced back to the spiritual wisdom seekers of the vedic period who worshiped the sun through mantra and prostration. Today's Sun Salutation attributes its roots to the vedic period but is very different to the one they would have practiced 3,500 years ago. The Moon Salutation, or Chandra Namaskar in Sanskrit, was created to practice in the evening as a cooling and calming end to the day. Both can be practised anytime of the day depending on what you are looking for from your practice. They both stretch and strengthen all the muscle groups, increase circulation, build a strong respiratory system, aid the digestive system, boost the immune system, unwind a busy mind and release physical and mental tension.

The repetitive and meditative quality of the movements in The Sun Salutation relaxes the mind and body, reducing stress and anxiety and increasing mental clarity. As you move through each pose you take either an in-breath or an out-breath which helps you link your breath with your movement. When done slowly it establishes a conscious breath that stimulates the vagus nerve and causes a chemical reaction which activates the nerve fibres and sends messages to the brain. The brain processes this information from the vagus nerve and initiates the parasympathetic ‘rest and restore’ response.

There are three main versions of Sun Salutation, or Surynamaskara. Sun Salutation A, B and C (also called Sun Salutation Classic). Sun Salutation C is the best version to start any practice with. You step back from your first Forward Fold/Uttanasana, to Anjaneyasana/Low Lunge, which is kinder on the joints while you give your system a chance to warm up. It also offers a softer decline to the floor through Knees, Chest, Chin, rather than Chaturanga Dandasana/Four Limb Pose. Coming all the way down to the ground offers a gentler backbend with Bhujangasana/Cobra, instead of a full Urdhva Mukha Svanasana/Upward Facing Dog. You can also incorporate a soft bend in the knees for the forward folds, allowing time for the hamstrings to warm up.

EXPLORING SUN SALUTATION IN YOUR PRACTICE
The Sun Salutation is the perfect place to start when building a home practice. It can be repeated as your whole practice or built into your flows as a warm up. For your 1st round of Sun Salutation C pause in each pose to observe your alignment. Use your second round to get used to what the breath is doing in each pose. Don’t worry if you get the breath wrong. It gradually starts to make sense – as a general rule of thumb, when you are folding down you are pressing all the air out of your lungs and when you are rising up you are filling your lungs. The third round builds in intensity by adding a small standing flow in the centre of each Sun Salutation. Finish by coming down to the ground with Malasana/Squat, pause for a few breaths in Baddha Konasana/Bound Angle and take a few minutes for your Savasana/Corpse Pose after a supine windscreen hip of the legs with bent knees.

Below is a step by step guide to Sun Salutation C. Each full Sun Salutation C consists of two rounds of this flow. In the first round step your right foot back after your first forward fold, and step your right foot forward after your second downward facing dog. In the second round step your left foot back and forward.

  • Tandanana/Mountain - stand at the top of your mat with feet hip width apart.

  • Urdhva Hastasana/Upward Salute - Inhale, reach your arms up high.

  • Uttanasana/Forward Fold - Exhale, fold forward.

  • Anjaneyasana/Low Lunge - Inhale, step your right foot back, knee to the ground.

  • Adho Mukha Svanasana/Downward Facing Dog - Exhale, step your left foot back.

  • Phalakasana/Plank - Inhale reach forward to stack shoulders over wrists.

  • Ashtanga Pranam/Knees, Chest, Chin - Exhale, lower knees, chest & chin to the ground.

  • Bhujangasana/Cobra - Inhale, press into your hands, lift chest up & lengthen forward. Lifting with the whole back

  • Adho Mukha Svanasana/Downward Facing Dog - Exhale, press back to Downward Facing Dog.

  • Anjaneyasana/Low Lunge - Inhale, step your right foot forward, left knee down to the ground.

  • Uttanasana/Forward Fold - Exhale step your left foot forward, folding down.

  • Urdhva Hastasana/Upward Salute - Inhale, reach your arms up high.

  • Tandanana/Mountain - Exhale, lower your arms down by your sides.

To save the images for personal use click and hold down the image until the ‘save image’ option appears; on Mac hold down ‘control’ and click the image to get the option box; on PC right click on the image to get the option box. Scroll down in the ‘option box’ and click ‘save image’.

Ruth Delahunty Yogaru