Sequences

Calming flow

PAUSE_0136.png

This sequence is also available on YouTube.

THE NERVOUS SYSTEM
The nervous system is our body's method of reacting to ever changing situations inside and outside the body. It sends ‘sensory’ messages to the brain, which responds by sending ‘motor’ messages to the glands and muscles of the body to cause a chain of reactions to the situation.

When we are stressed the sympathetic nervous system, or the ‘fight or flight’ response, is firing. The nervous system sends signals to the brain and the brain decides the best action to take. In this stressed state it signals the body to increase heart rate and blood pressure, open our airways, inhibit digestion and reproductive organs, stimulate adrenaline production, open our sweat glands and tense the muscles ready for action. All with the purpose of dealing with the perceived stressful situation. When the stress has eases the body clears out the stress hormones and resets the organs and systems. But when we are constantly being triggered by stress the body gets stuck in this cycle and the systems get flooded by stress hormones it can’t flush out quick enough. In an ongoing state of chronic stress the organs of the body are not working optimally – reducing the functionality of the immune system, causing inflammation and eventually leading to health issues.

When the parasympathetic nervous system, or ‘rest and restore’ response, is triggered the nervous system sends signals to the body to reduce heart rate and blood pressure, relax our airways, stimulate digestion and reproductive organs, inhibit adrenaline production and relax the muscles. This creates optimal conditions for the functionality of the organs of the body, strengthens the immune system and relieves symptoms of stress, anxiety and tension.

These two reactions are autonomic nervous system responses which means they are involuntary and not something we can switch on and off. But we can create favourable conditions to influence which response we are in, depending on what we are looking for. They work hand in hand and when strong and malleable have the ability to shift smoothly from gear to gear throughout the day. To simplify it – our sympathetic nervous system gets us out of bed and helps us get our work done, and our parasympathetic nervous system help us rest and restore at the end of the day and gets us ready for a good night sleep. The body strives for balance and will always look to come back to homeostasis. Yoga is one of the best methods for helping your body find this delicate balance between the two nervous systems.

WHY IS YOGA CALMING?
What is it about yoga that makes it so calming? A question I frequently asked and was never completely satisfied with the answer ‘because it balances the nervous system’.

There are many nerves responsible for the parasympathetic response, most of them come from the cranial nerves with just three coming from spinal nerves. The main cranial nerve associated with 75% of the parasympathetic nerve fibres, and for regulating the parasympathetic response, is the vagus nerve. It travels to and from the brainstem straight to the throat, heart, diaphragm, stomach, kidneys, liver, pancreas, gallbladder, sphincter and reproductive organs. It initiates the parasympathetic responses to slow heart rate and reduce blood pressure, relax our airways, stimulate digestion and reproductive organs, inhibit adrenaline production, stimulate endorphin productions and relax the muscles.

BREATH, MOVEMENT AND CONSCIOUSNESS
There are three pathways to tapping into the vagus nerves – the way we breathe, how we move and how present on our mat we are during our practice. The vagus nerve runs through the centre of the diaphragm. When we breathe, in particular an extended exhale, the diaphragm stimulates the vagus nerve and causes a chemical reaction which activates the nerve fibres and sends messages to the brain. The brain processes this information from the vagus nerve and initiates the parasympathetic response in all the parts of the body which this ‘wandering nerve’ travels to. The breath is one of the fastest ways to stimulate the vagus nerve which is why it is so important in yoga.

Receptors called mechanoreceptors are found in the hips, knee, shoulders and spinal joints. We activate them by gently moving and stretching the connective tissue of these joints. They respond by sending signals to the brian to inhibit the sympathetic response. When the sympathetic nervous system is inhibited the parasympathetic nervous system kicks in.

Being present on our mat as we move also has a big impact in the effectiveness of our practice in terms of calming and soothing. When we consciously take the time to switch off and include some self care into your day it helps start a positive mindset. Sometimes stress can be managed by just consciously breaking the loop. This combined with the breath and movement allows the vagus nerve to communicate with the amygdala (emotional response) and reduces its inclination towards the sympathetic ‘fight or flight’ response and rewires it towards a parasympathetic response. Think of the vagus nerve as the steady minded peacekeeper at decision times.

EXPLORING FINDING CALM IN YOUR PRACTICE
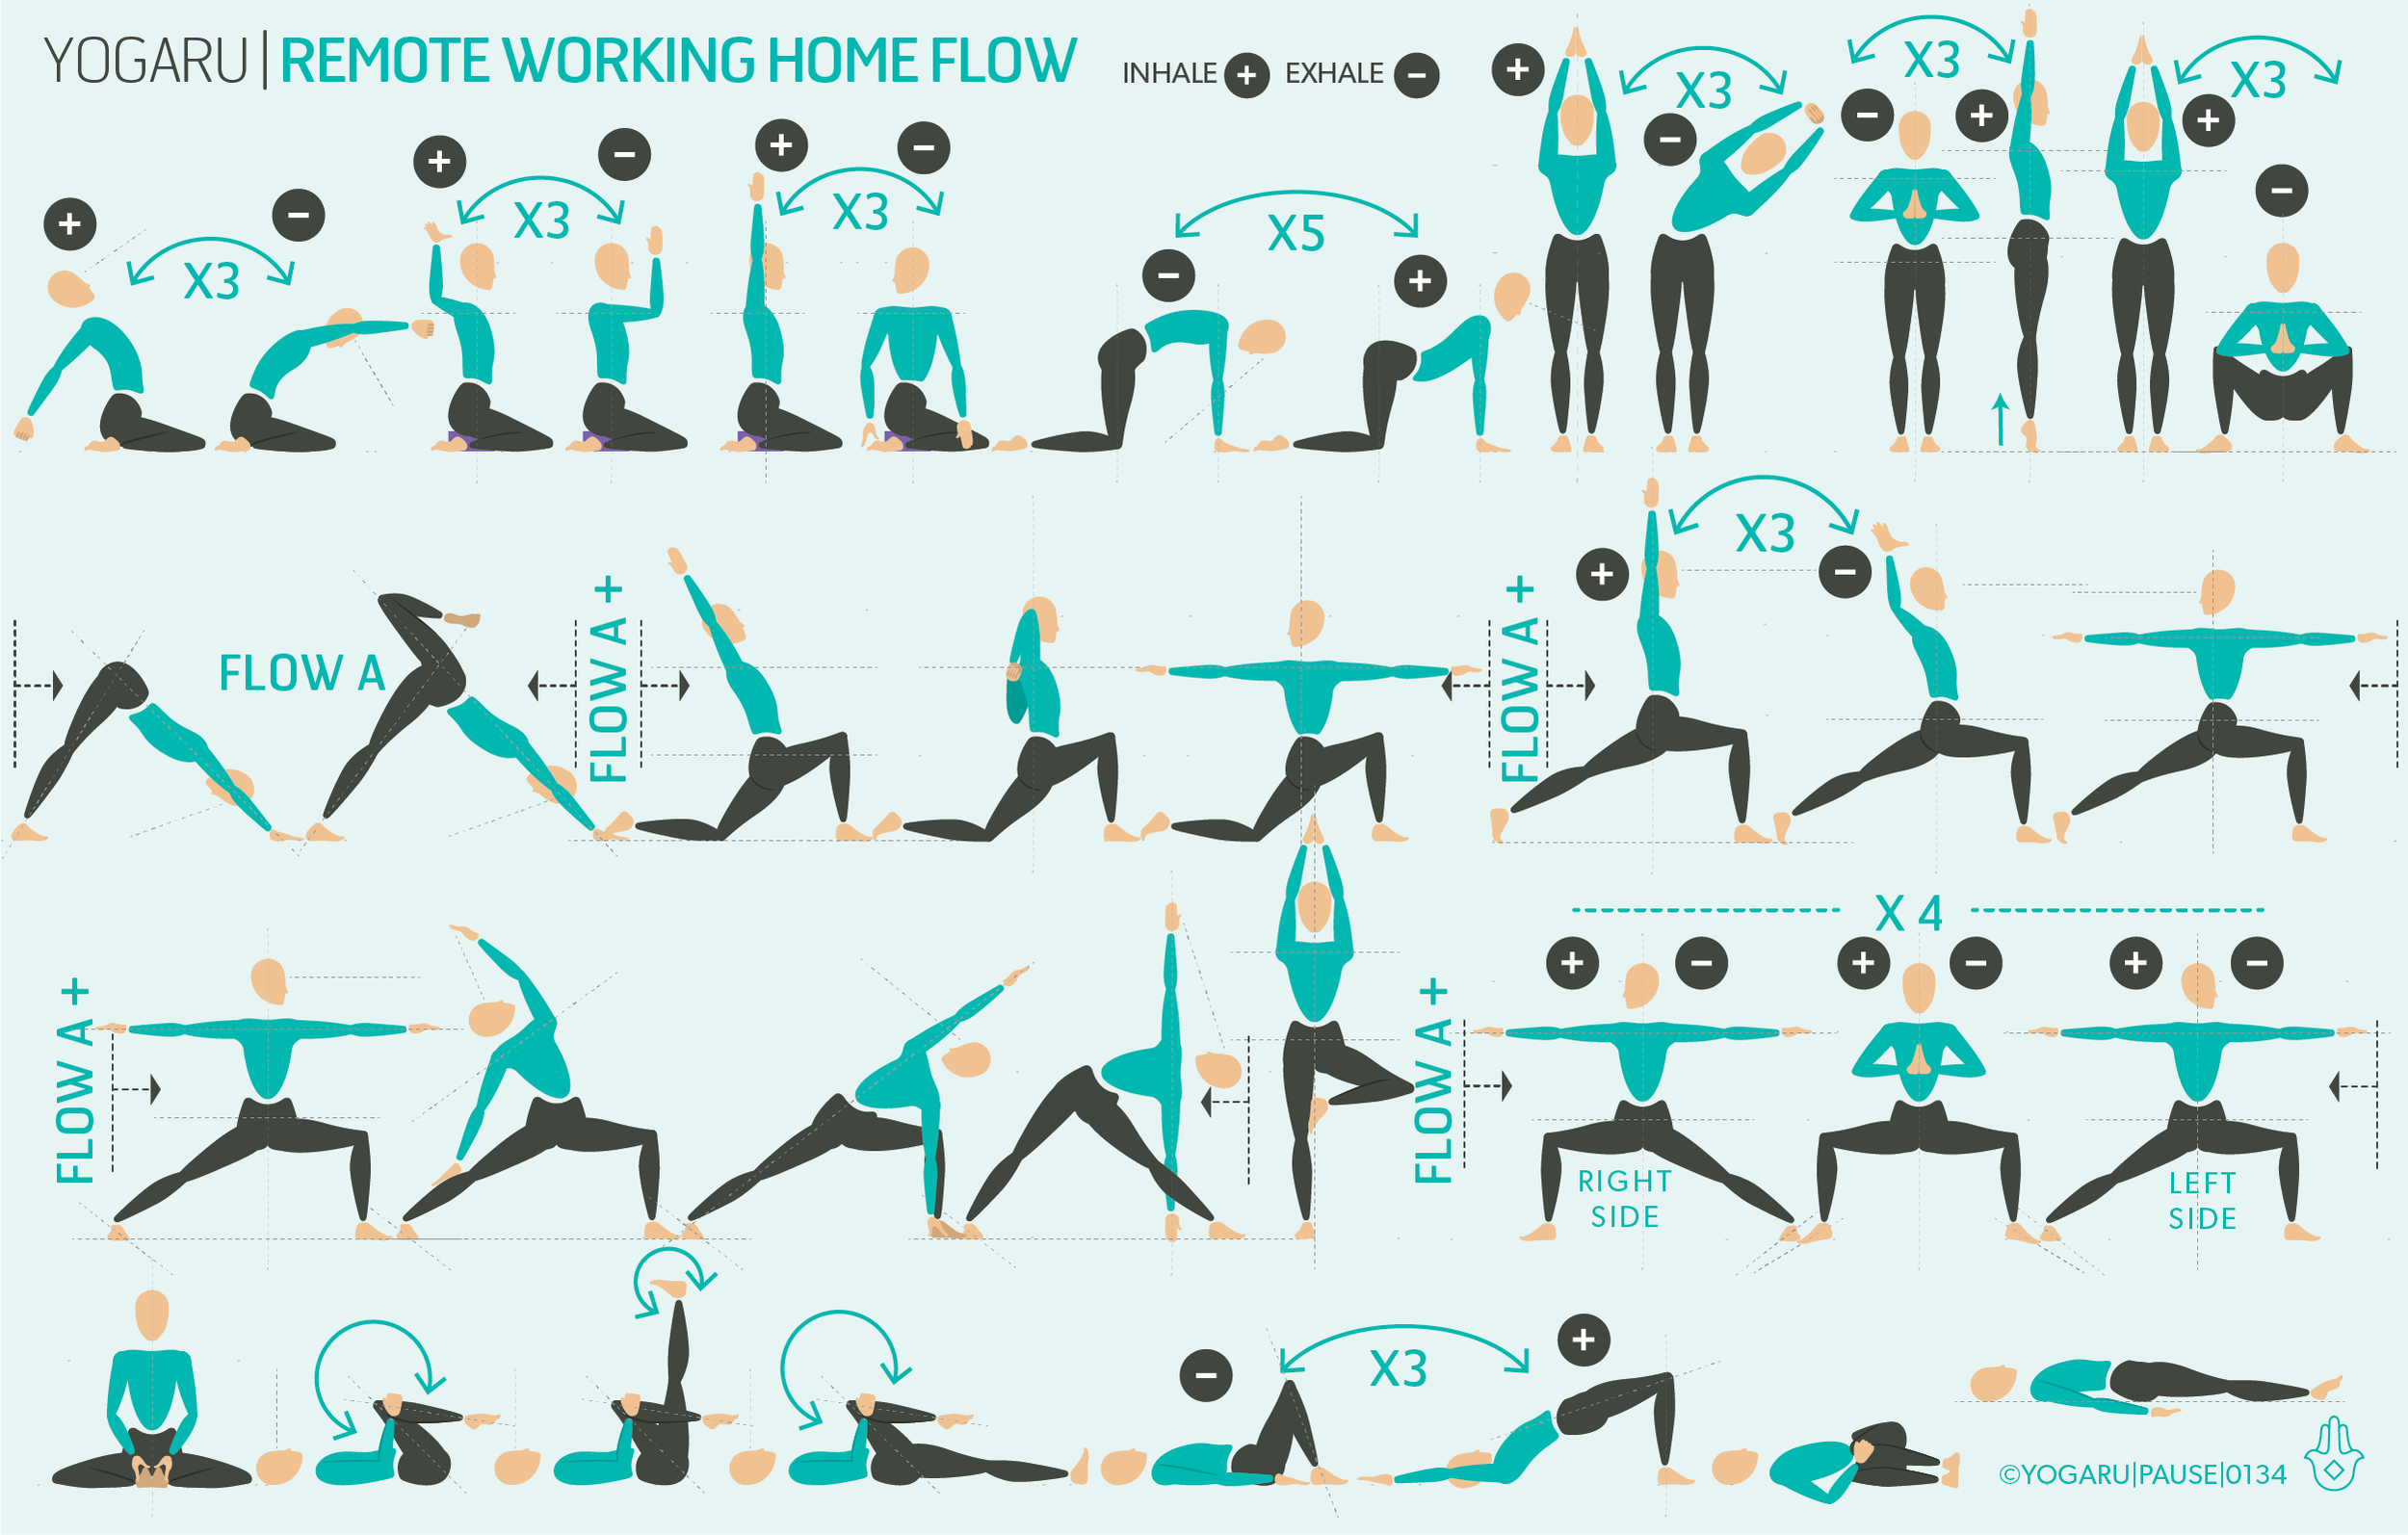
This sequence starts with some gentle repetitive flows to link movement with breath, ease out any held tension and initiate the calming process. This will gently help the mind and body to accept the idea of clearing out stress, anxiety or tension and transform to a calmer state of being.

Start your practice with a few rounds of viloma breath to help you link with your breath and naturally lengthen the exhale. You can do this lying on your back or in a comfortable cross legged seated position. Viloma breath breaks the exhale into three. When you are ready take one full breath for nothing, then inhale completely, exhale, pause, exhale, pause, and exhale the full breath.

After your standing flows you will come down for some seated poses to bring you down to a grounded practice and continue to cultivate a calming practice.

ALIGNMENT CUES
The mini flow will help you connect breath with movement. You will see a ‘+’ for the inhale and a ‘-’ for the exhale to help you establish a nice smooth breath. If you are finding it hard to shift to a lower gear continue to repeat the mini flow until you notice you are starting to flow with ease and a sense of submission to the practice.

The peak pose of this sequence is Upavistha Konasana/Wide Leg Seated Forward Fold which is a calming seated forward fold.

Have a read of the tips below and either print out the sequence or save it onto your device:

  • From Dandasana, open your legs out wide, press out through the heels, thighs pressing into the ground, toes pointing up.

  • Place your hands either side of your hips, stack your pelvis.

  • Inhale, lengthen up through your spine, exhale, fold forward from the hip joint, stretch your arms out between your legs and lengthen through the front, sides and back body, draw your navel towards your spine. Sit bones reach back.

  • Lead with your sternum, inhale, lengthen the spine, exhale, release further forward, walk your hands forward a little as you fold forward, or hold onto your big toes, gaze down.

To save the images for personal use click and hold down the image until the ‘save image’ option appears; on Mac hold down ‘control’ and click the image to get the option box; on PC right click on the image to get the option box. Scroll down in the ‘option box’ and click ‘save image’.

Ruth Delahunty Yogaru

Remote working home flow

PAUSE_0134.png

REMOTE WORKING CHALLENGES
We have all been working from home for almost a year now and unless you were already set up with a home office you may be working from a less than ideal space which adds extra challenges to sitting for long periods of time. Kitchen tables were not designed for hours of working on a computer. If like me your table is too high you will end up with your shoulders very hunched and wrist strain. You might be sitting on a kitchen chair which most likely is not giving the back support you need. Over the course of the day you will start to feel progressively tighter and achy in the hips, shoulders, neck and lower back. A little bit of stretching during or after your working day can make all the difference.

WHAT IS GOOD SITTING POSTURE
We know that prolonged periods of sitting compromises our posture, spinal health and overall wellbeing. Taking breaks from sitting and ensuring your sitting posture is good will help. You might be limited by your workspace on some of the recommendations, but have a read of the below and see what you can improve on throughout your working day:

  • Rest your feet on the floor or if your chair is too high place a prop under your feet.

  • Have your knees at the same height or slightly lower than your hips.

  • Avoid crossing your legs or ankles to allow good blood flow through the legs.

  • Shoulders release away from your ears.

  • Lengthen through the spine to the tip of your crown.

  • Keep your back against the chair with a natural curve in your lower back.

  • Distribute your body weight evenly into both hips.

  • Height of your table should give you a natural L’ shape in your arms.

  • Height of your computer screen should be eye level.

  • Take a standing break every hour of sitting.

  • Stretch your gaze at something in the distance during your standing break.

WHY YOGA
With remote working we are all inclined to work longer hours into the evening. While you may feel you are getting lots of work done, you will most likely find when you finally hit the bed exhausted, your mind is processing away all the information and hasn’t had a chance to switch off. This leads to a disturbed night sleep, tiredness, poor focus and another day of working late. Sound familiar? Stepping away from your work and focusing on your wellness is completely acceptable. Especially in the current climate when we are all being encouraged to get plenty of fresh air and look after our mental health to counteract the unprecedented period in time we are currently living through.

Yoga has many benefits, many of which are listed below with a guide to which pose will help the most. With regards to the benefits of yoga to remote working yoga stretches and strengthens muscles that have been weakened by sitting , realigns the spine, improves posture, builds focus & concentration, eases headaches, insomnia, fatigue, stress tension & anxiety, increases circulation and boosts the immune system.

YOGARU_Benefits.png

EXPLORING REMOTE WORKING HOME FLOW IN YOUR PRACTICE
Remote working makes practising yoga from home even more accessible. Yoga is one of the easiest movement based practices to slot into your day, all you need is a yoga mat. This sequence focuses on simple poses to gently undo all the stiffness from long hours sitting. No need to change into yoga gear just take a break during your working day, roll out your mat and get started. You can break the sequence up throughout your day to keep moving or do the full sequences in one practice. Alternatively get into your comfies and use it as your switch off time at the end of your day to ease out any aches and pain in your hips, shoulders and neck, and realign your spine.

The first row of the sequence can be practiced at your desk, seated and standing, as a mini stretch break or on your mat to start the sequence off. A yoga mat is advised for the following two rows of standing poses to give you some grip. Socks off is always better to let the sticky mat do its job. The final row can be done either on your mat, lying on a blanket or whatever you find comfy. This last line can also be practised just before bedtime to get the spine and hips ready for a prolonged period of rest and restoring as you sleep. If you would like to practice for a bit longer you could also add in some Sun Salutation Cs just after the first row of poses and before each mini flow. Mini flows are the group of three to four poses between the arrowed lines. So for example add a Sun Salutation C before the two lunge mini flow on the second row and before the two warrior flows on the third row. You can also add in more side stretches and twists in any of the standing poses. They are very beneficial for spinal health and are great for getting the circulation going again.

ALIGNMENT CUES
As always, move nice and slow as you practice this sequence. Concentrate on any stiff areas you may have from sitting. There are a few two pose flows which will help you connect your breath with the movement. You will see a ‘+’ for the inhale and a ‘-’ for the exhale to help you establish a nice smooth breath for the suggested rounds. There is no particular peak pose in this sequence. Below are some tips and additional alignment cues for you to try as you practice.

  • Practice the first six poses throughout the day at your desk.

  • Take hourly breaks where you stand up and do one or two of the standing mini flows from row one.

  • Pause in a few poses and breath in for the count of 4 out for the count of 6.

  • Add a side stretch when you come to low lunge and again when you come to high lunge.

  • If you are looking for a shorter practice leave out one of the lunge flows and the warrior flows.

To save the images for personal use click and hold down the image until the ‘save image’ option appears; on Mac hold down ‘control’ and click the image to get the option box; on PC right click on the image to get the option box. Scroll down in the ‘option box’ and click ‘save image’.

Ruth Delahunty Yogaru

30 days of restorative yoga

PAUSE_0132.png

BRINGING RESTORATION INTO YOUR EVERYDAY
I love restorative yoga. But I find that between my daily routine of yoga, walks, sea swims, home schooling and dinners, I don’t regularly find time to settle into an hour long restorative yoga home practice. This month I have made a commitment to myself to practice just one restorative pose each evening. My intention is to make it manageable and aim for just 10 minutes each day. I am only a few days into the process and I am already feeling the benefits. I am calmer in the face of all the uncertainty going on in the world at the moment and definitely sleep much better on days that I carve out this small commitment to myself. Join me and start today, just 10 minutes a day and notice the immediate benefits you will feel.

THE BENEFITS OF RESTORATIVE YOGA
The process of restorative yoga ‘takes a body that is feeling fragmented and puts it back together again in the kindest way possible’. Restorative yoga is the king of all yoga in terms of physical and mental wellbeing. It is particularly beneficial if you are feeling tired, stressed, anxious or have recently been ill. One of the main benefits of yoga, restorative yoga in particular, is that through the nervous system it strengthens the immune system. One of the ways it does this is through the breath, which stimulates the vagus nerve which runs from the brain to the abdomen and is the longest cranial nerve. This brings the body into the rest, digest and restore response, or the parasympathetic nervous system. This creates optimal conditions for the functionality of the organs of the body, strengthens the immune system, and relieves symptoms of chronic stress, fatigue and tension.

PROPS ARE KING
Props are king in restorative yoga, the more the merrier! It is worth the time invested in getting all your props ready to go before you settle into your practice. As you get used to practicing restorative you will become a ‘prop pro’ and know exactly how you specifically like to support yourself in each pose. Sometimes when I am arranging my props I am reminded of happy hours as a kid building all sorts of fortresses with every cushion and throw available. To get started you don’t need to have an array of official yoga props. You can improvise with household items using my prop swap guide in Restorative with home props. The props you’ll need for these restorative poses are – a bolster, two yoga bricks, two to four blankets.

EXPLORING YOUR DAILY POSE
Set yourself up with all you will need and more before you get started. Even though you are only taking one restorative pose the body will cool down quickly so layer up and stay warm. Unlike regular yoga this is a socks on, stay cosy, practice.

For your daily pose set a timer for 10 minutes, or 5 minutes each side if it is a two sided pose. As you settle into your daily routine and get used to being still you might like to extend how long you hold the pose. Be guided by what you feel you need. If I’m feeling frazzled I will stay in the pose for 20 minutes, or 10 minutes each side for a two sided pose. Remember when you are feeling stressed and anxious this is EXACTLY what you need, but a stressed and anxious mind will desperately try to convince you it wont work! You can use your phone as a timer or you can use your instinct if you don’t like the idea of being disturbed with a sound. If you choose to use your phone set the alert to a soothing sound like ‘chime’ or ‘pulse’. Scan down from head to toe and ensure every part of your body is happy. If after a few minutes you start to feel discomfort move or add more props to find comfort again.

START WITH THE BREATH
When you settle into your chosen daily pose take four to five rounds of Viloma breath – inhale for a long breath, and then exhale pause, exhale pause, exhale pause – dividing your exhale into three sections. Keep the breath as gentle as possible, notice if you are holding any tension in your shoulders and upper chest when you concentrate on the breath. Pause after your rounds and observe any change to your body and mind. As gravity and the weight of your body draws you down to the ground, feel the ground come up to support you as you melt into your practice.

Below are ten Restorative Yoga poses for you to choose from each day. Start with No.1 and work your way through the ten poses or pick and choose a different pose everyday. If there is a pose that you find particularly beneficial you can repeat this one as often as you like. You can also pick two or three poses if you would like a longer practice. At the end of your practice take a minute or two to prepare yourself to go back into your day and bring some of the lovely calm you have cultivated with you. Bring your attention to the breath again, as you inhale think ‘this is me now’, and on your exhale tell yourself ‘this is the same me in the outside world’.

ALIGNMENT CUES
Below are the restorative techniques used in this sequence..The props you’ll need are:
1 x bolster - or 2 towels, wrapped around a horizontally rolled pillow and tied to secure.
2 x yoga bricks - or 2 two thick similar sized dictionaries.
2 x yoga blankets - or any wool, thick cotton or fleece blanket with density.

No.1 - Resting savasana
Start lying on your back with a folded blanket under your head, a bolster under the creases of your knees and a blanket over you. Lift your buttocks and slide the flesh of the buttocks downwards. Legs and arms extended. Arms slightly away from your body, palms facing up. Legs slightly apart, feet gently flop out to the sides. Shoulders melt to the floor, back of the neck long. Gently close your eyes, eyeballs become heavy in their sockets, soften the temples and find ease in the tiny muscles around the eyes. Soften the muscles across your forehead, skin is smooth as silk. Let the body become heavy and melt into the support of the ground. Notice all the muscles and bones of your body become heavy.

No.2 - Mountain brook
Start lying on your back with a half rolled blanket under your head, nestling the rolled part in the curve of your neck. Place a rolled up blanket under the lower tips of your shoulder blades and a bolster under the creases of your knees. If you have an additional blanket place it on top of you for warmth and for comfort. Legs and arms extended, palms facing up. Feet gently flop out to the sides. Shoulders melt to the floor. Eyeballs become heavy in their sockets, skin on the forehead smooth as silk. Soften the temples and find ease in the tiny lines around the eyes.

No.3 - Supported bridge
From lying, lift your hips up and place the bolster horizontally under your hips. If your homemade bolster is too low add your two book bricks under the bolster. Settle your hips down onto the support of the bolster. Knees bent, feet hip distance apart or feet mat distance and knees together. Arms in cactus position or extended either side of your body, palms facing up.

No.4 - Bolster twists A
Place your bolster vertically along the top centre of your mat with a folded blanket at the top. Sit with your right hip up against the end of the bolster. Place your hands on the mat either side of the bolster and with an inhale lengthen through the whole spine and on your exhale gently place your front spine along the length of the bolster. Place your right cheek on the folded blanket and let your arms gently hang either side of the bolster. Repeat on the left side.

No.5 - Bolster twist B
Place your bolster vertically along the left side of the middle of your mat. From lying, with a blanket under your head, extend both legs out along the mat and roll your hips to your left, bend your right knee and place it on the support of the bolster, left leg remains extended. To feel this twist let your upper body and right shoulders settle down onto the mat. Bring your arms to cactus position, with arms lifted and elbows bent either side of the body, gaze over your right shoulder. If the twist is too intense add a folder blanket under your knee on the bolster. If the raised arms don't suit you, bring your arms either side of the body palms facing up. Repeat on the left side.

No.6 - Blissful banana
Make a pillow with a book brick and a blanket on top of it at the top of the mat, place a tin prop above this at arms reach. Place your bolster horizontally on your mat with a space between your bolster and pillow. Sit with your right hip next to the long edge of the bolster, knees bent. Lengthen your right side along the mat and nestle the bolster into the curve of your waist. Place your head on your pillow, your shoulder in the space between your bolster and pillow and extend your right arm forward. Extend your left arm overhead and place hold onto the tin prop. If the raised arm doesn't suit you, bring your arm down and place it at your right arm. Repeat on the left side.

No.7 - Back release
Place the bolster horizontally along the centre of your mat with a rolled up blanket at the top of your mat. Come onto your front and lie with your belly on the bolster. Bring the arms to cactus position and place your forehead on the rolled up blanket. If this is uncomfortable on your neck you can flatten the blanket and lie on your cheek remembering to swap sides after a few minutes to even out your neck stretch.

No.8 - Supported baddha konasana
Place your bolster vertically along the top of your mat with a rolled up blanket under the top. Make a head pillow with your second blanket to the top of your bolster. Have ready your book bricks and tin either side of you. Sit with the back of your hips up against the bolster. Bring the soles of your feet together and let your knees drop out to the sides. Prop your knees up with one book brick and tin each side. Gently lie back onto your bolster and place your head on the pillow at the top.

No.9 - Hip opener
From lying, with a blanket under your head, lift your hips up and place the bolster horizontally under the creases of your hips. Lengthen your legs out straight and bring your arms to cactus position, with arms lifted and elbows bent either side of the body. If this is too intense a stretch on the lower back, use a rolled up blanket instead of the bolster. If the raised arms don't suit you, bring your arms either side of the body palms facing up.

No.10 - Supine twist
From lying on your back bend your knees and place your feet hip distance apart. Gently let your knees drop to the left side of your mat. Extend your right knee away from your. Bring your arms to cactus position, with arms lifted and elbows bent either side of the body, gaze over your right shoulder. Stay here for 5 deep breaths and swap to the other side. If the raised arms don't suit you, bring your arms either side of the body, palms facing up.

To save the images for personal use click and hold down the image until the ‘save image’ option appears; on Mac hold down ‘control’ and click the image to get the option box; on PC right click on the image to get the option box. Scroll down in the ‘option box’ and click ‘save image’.

Ruth Delahunty Yogaru