Sequences

10 day yoga challenge

SUIT YOUR NEEDS
Developing a home practice can sometimes feel a bit daunting to yogis at any level of experience. You may feel overwhelmed by what pose to do next, how long to hold a pose or how long to practice for. This series of mini sequences will guide you through a simple practice and give you a taste of the many benefits you can get from a manageable 10 minute daily practice. With an added promise that your home practice will become your best friend and your most important supportive routine for staying physically and mentally, in your own space, in your own time.

Home practice gives you the freedom, in the safety of your own home, to step on your mat when it suits you and practice exactly what you need, as often as you like. Putting aside some time for yourself and developing a home practice gives you the tools to take ownership of your wellness through yoga. Building a relationship with your practice, and getting to know your strengths, your limitations, your favourite asana, helps you tailor your practice to suit your needs.

PAUSE_0130_B.png

KEEP IT SIMPLE
Most days my home practice is 10 minutes of a very simple sequence. I give myself plenty of time with warm ups lying on my back and move slowly through some Sun Salutations. In your home practice you can flow at your own pace and listen carefully to how your muscles are feeling. Your body reacts differently to the practice from day to day, and from hour to hour. If you choose the practice in the morning you feel the benefits for the day ahead, if you choose to practice in the evening it will help you unwind from the day and relax after a busy day. Take time to slow down, move with your breath, and stay in the poses a little longer to explore where you feel the stretching and strengthening actions.

GET STARTED
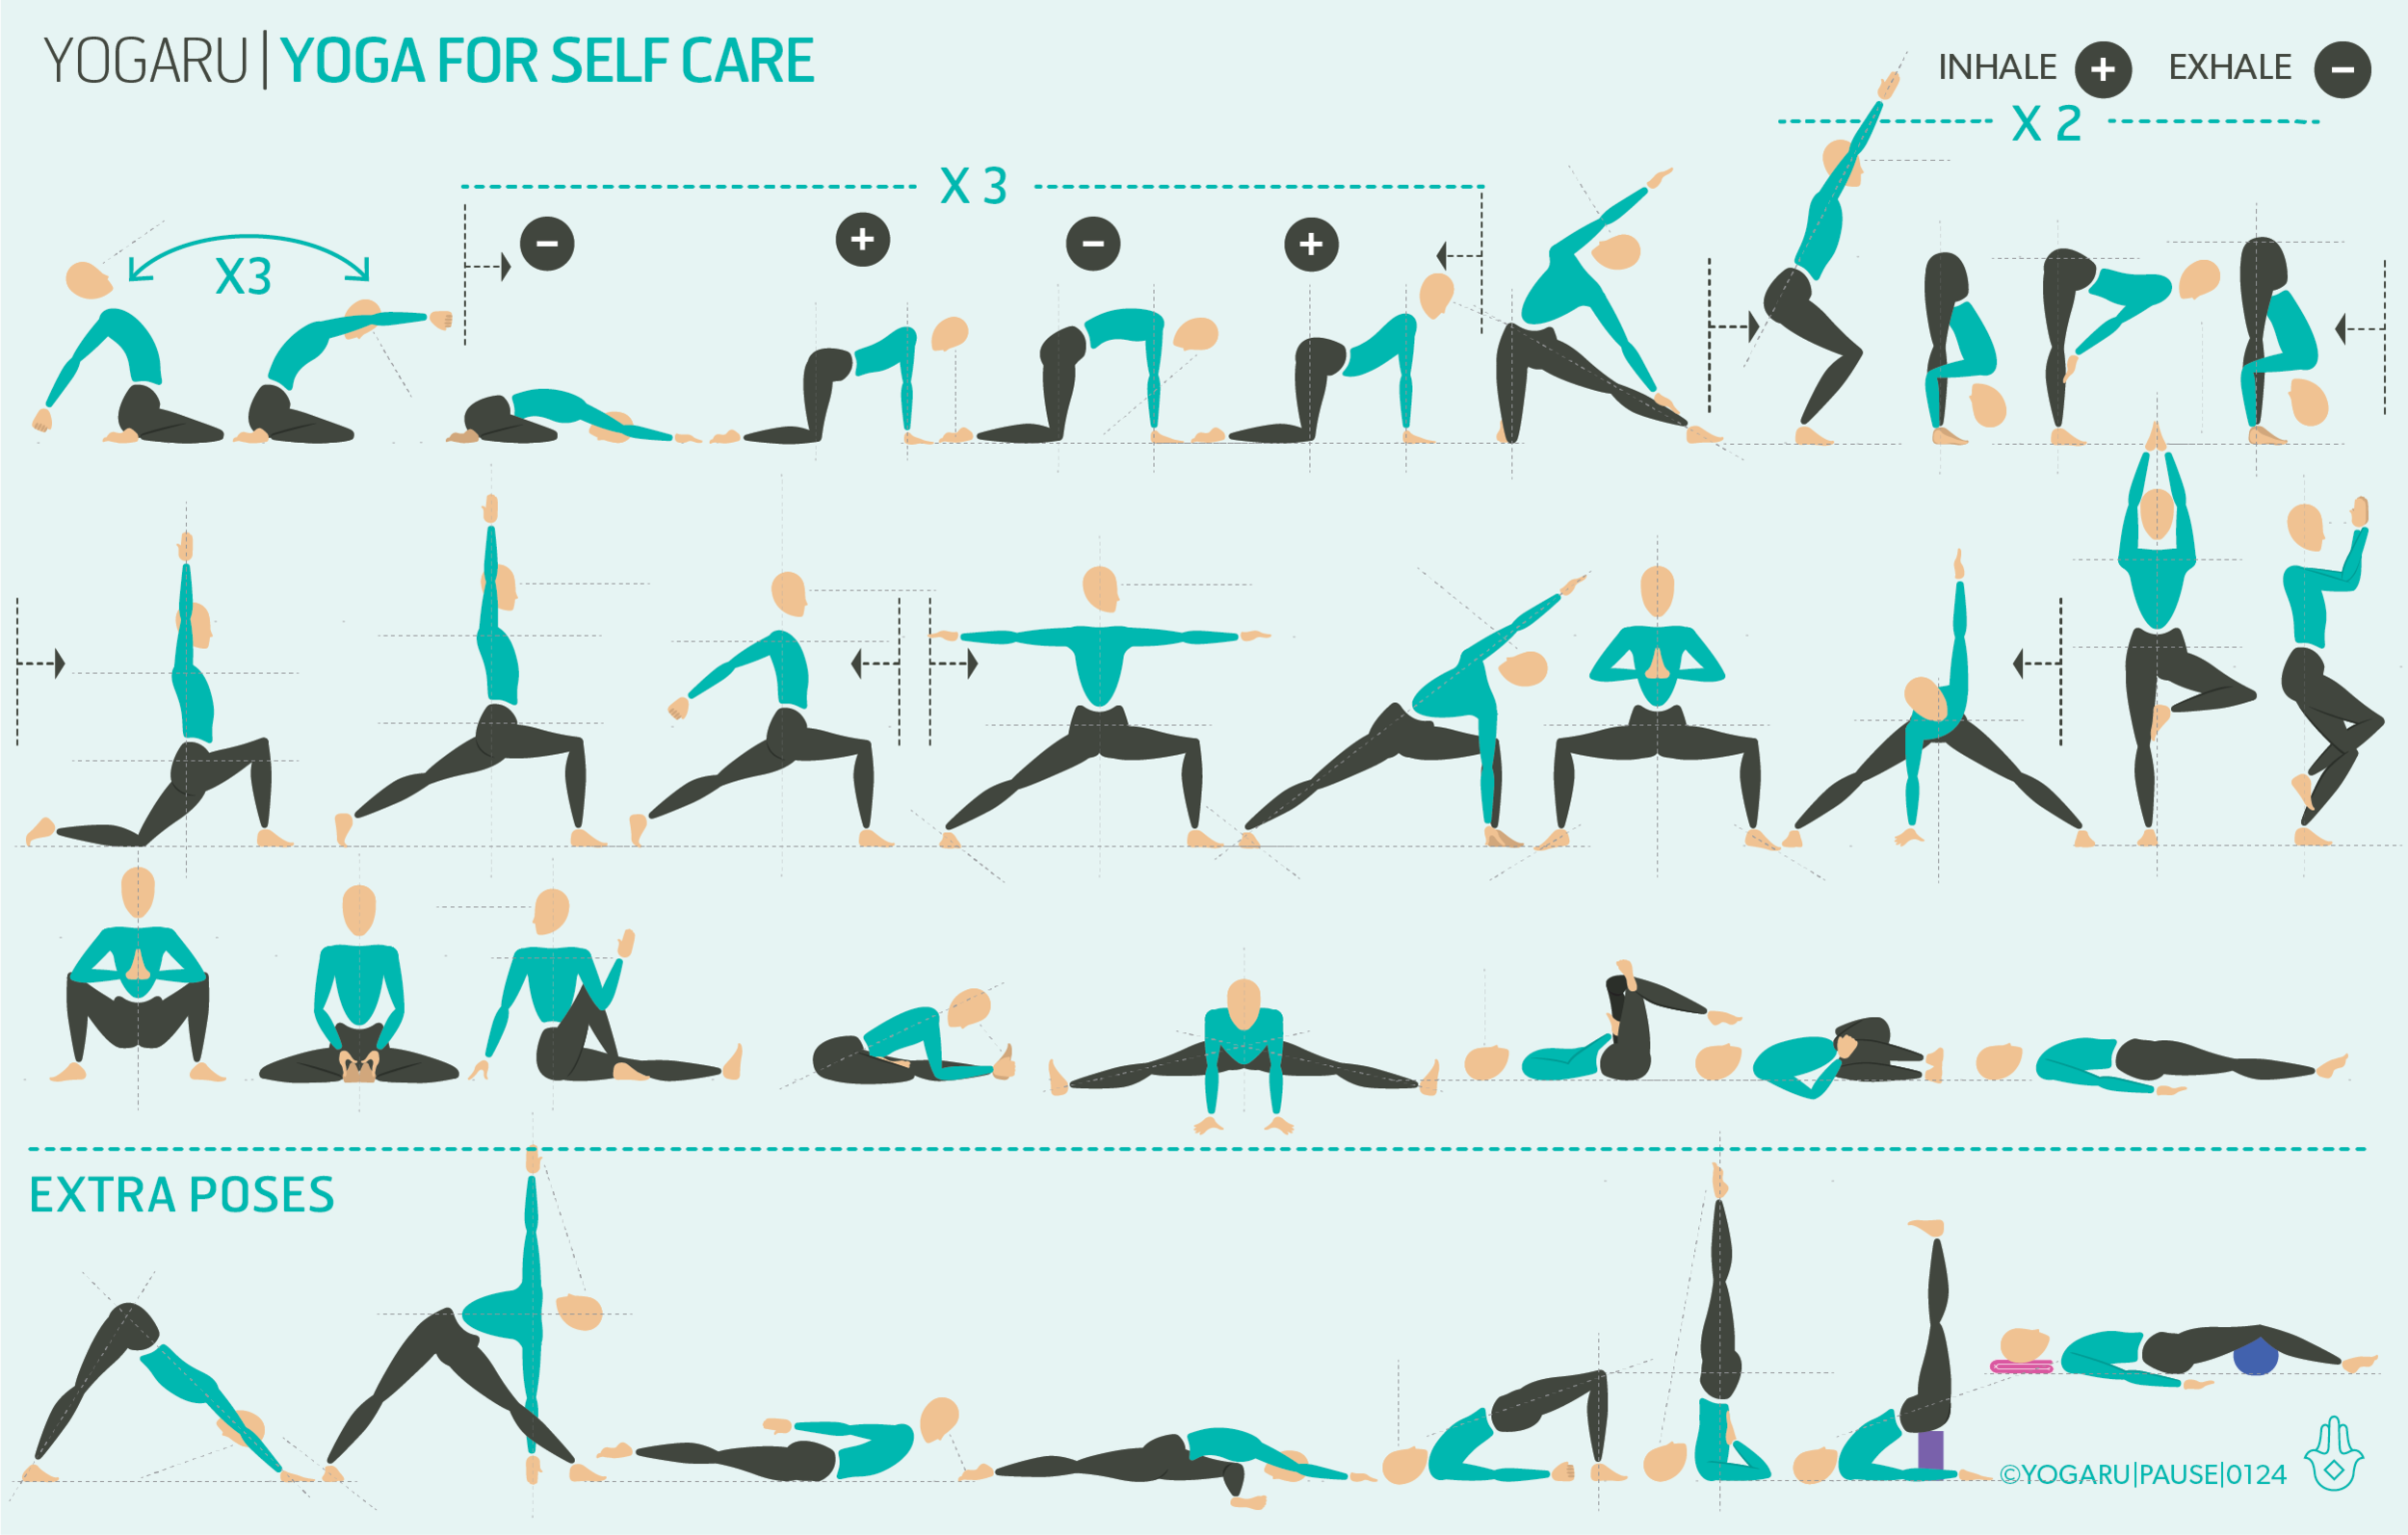
All you need is a yoga mat and enough space to roll it out! Bricks and blocks can be handy props but they’re not essential to get started. You can do these short sequences at any time of the day. The Sun Salutation is a great place to start – it has an array of movements that strengthen and stretch all the major muscle groups. The repetition is very calming and helps to link your breath with the movement.

Sequences are often built of mini flows where you step from one pose straight to the next. You will see these in the 10 sequences above as 2-5 poses enclosed by two arrowed lines. You flow through these connected poses on the right side first (right foot forward) and then take those poses on the left side (left foot forward). Downward Dog or simply Tadasana are often used as the transitional pose between mini flows.

The breath is one of the most important elements of stress relief in yoga. As you move try not to get caught up too much on whether it should be an inhale or an exhale, just don’t forget to keep breathing! At the end of your practice remember to always take Savasana for a minute or two to assimilate your practice and re-enter your day gently.

10 TIPS FOR YOUR HOME PRACTICE
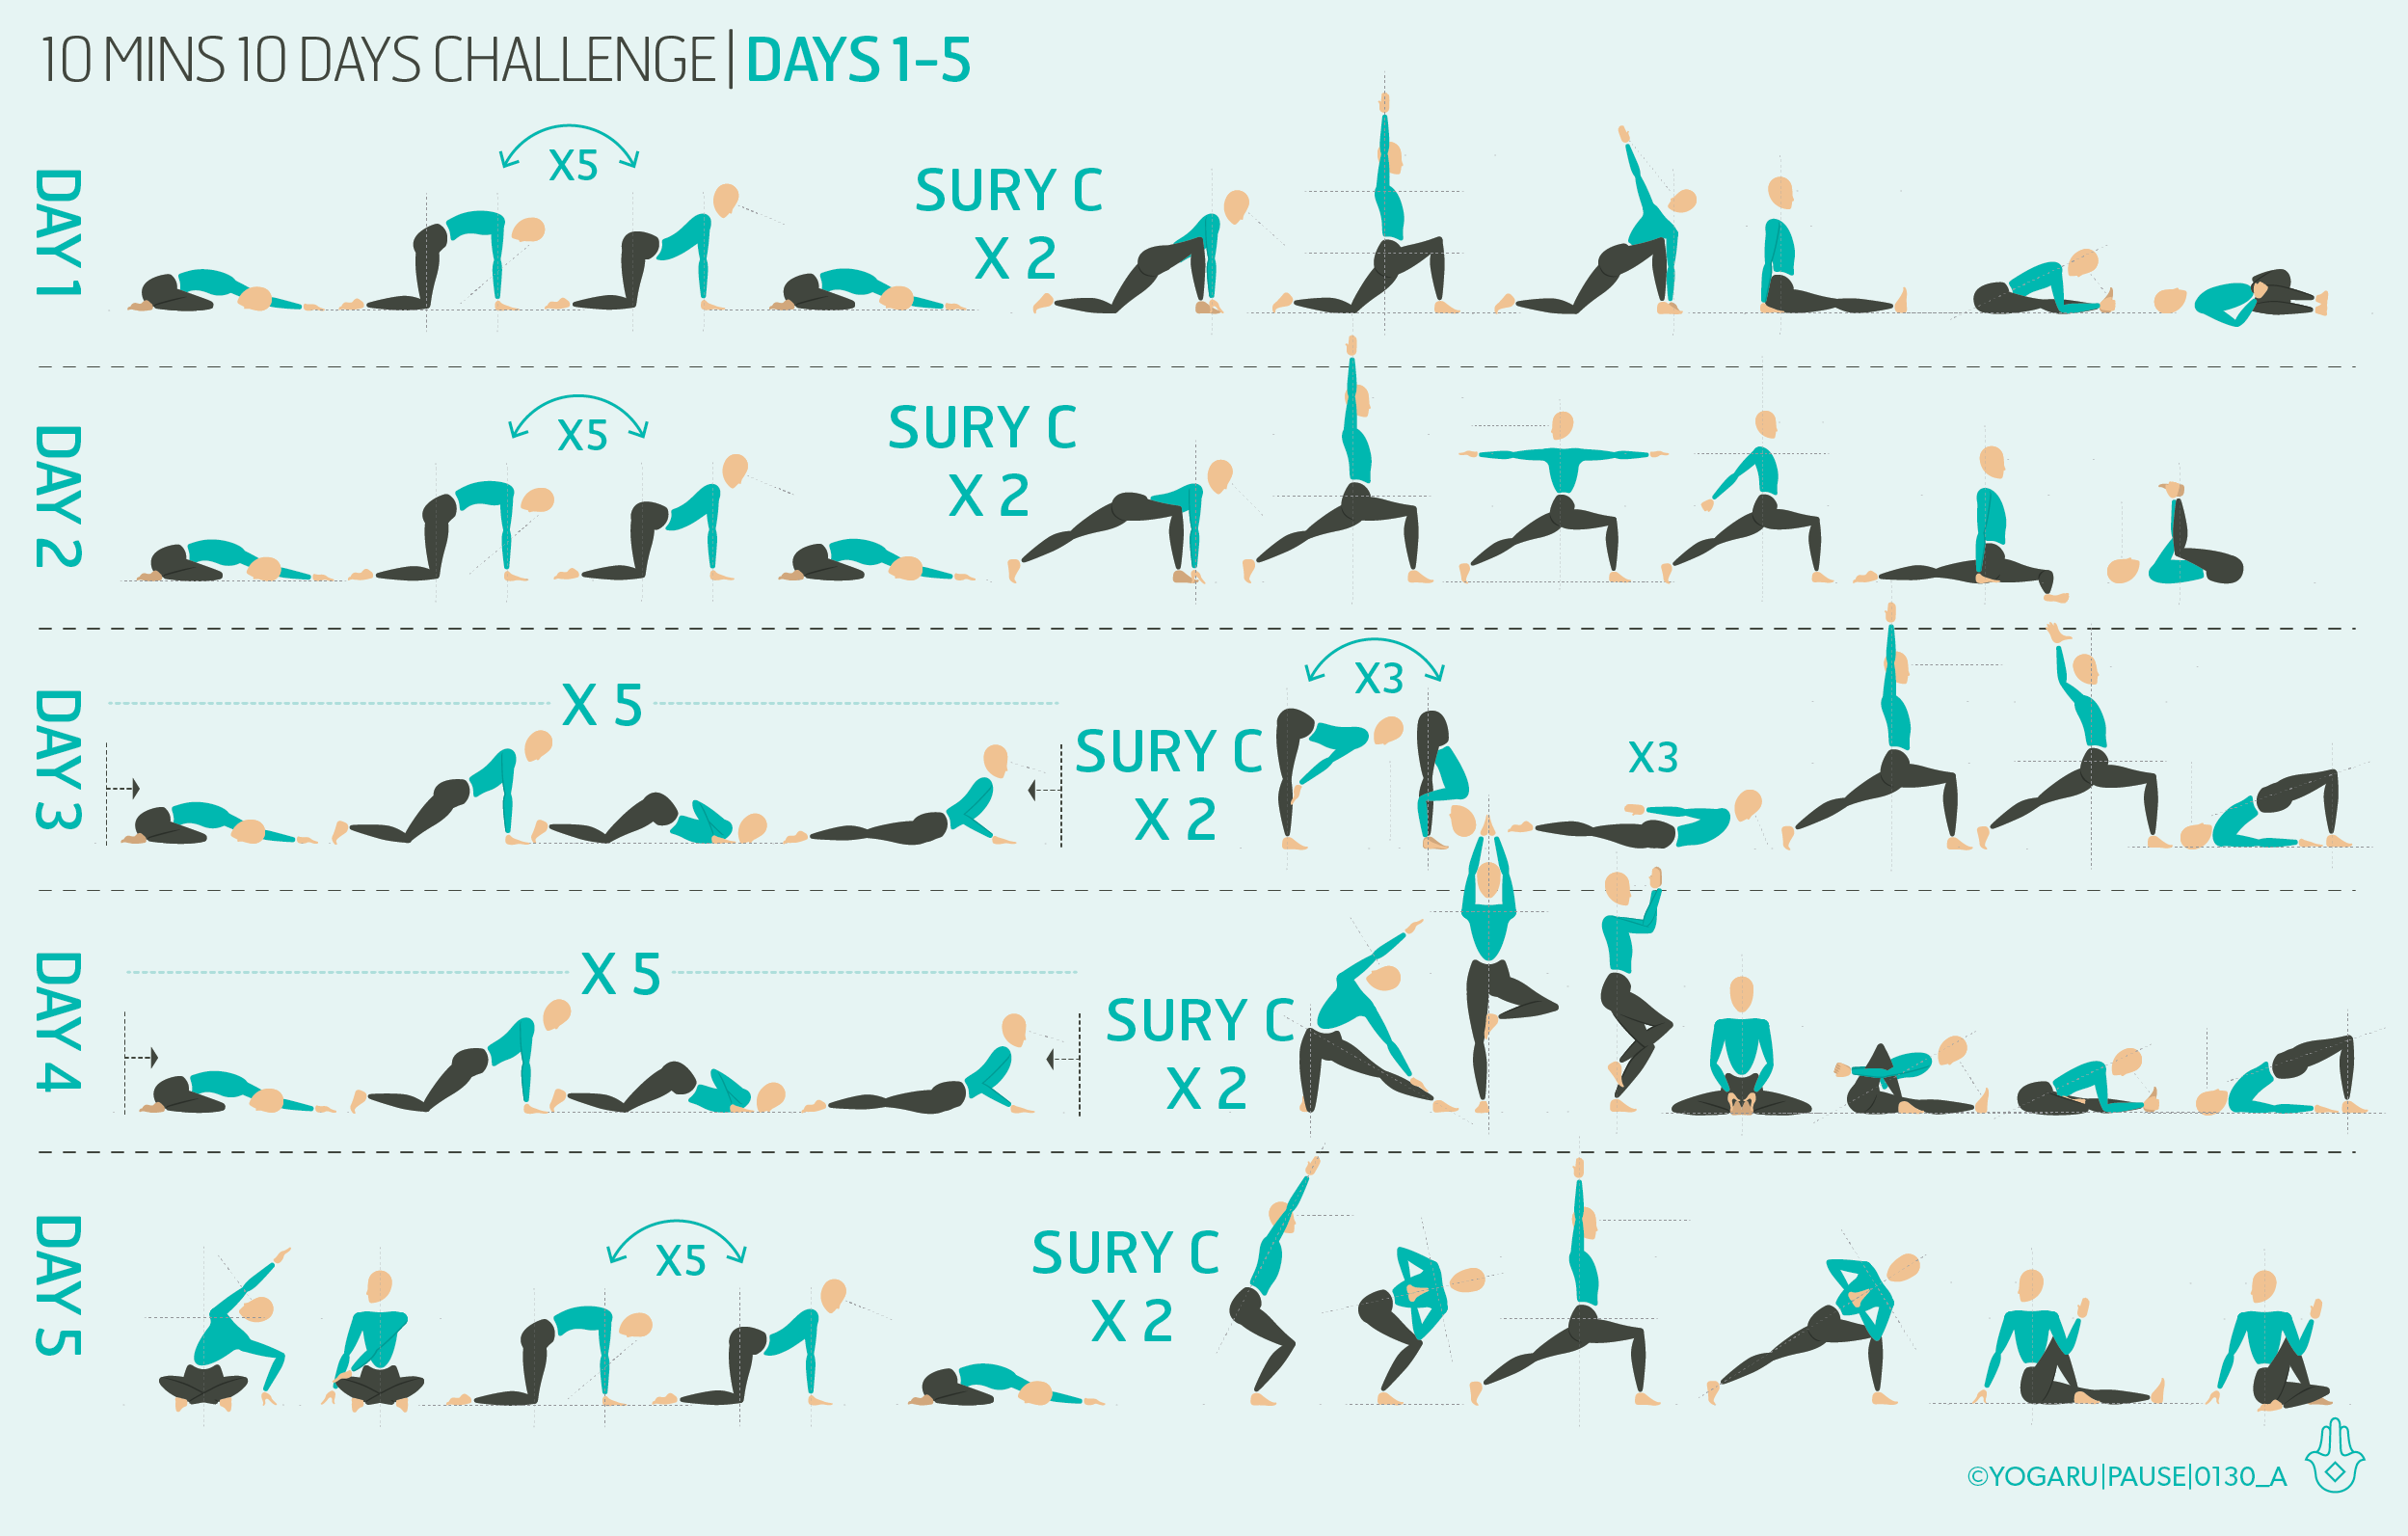
Tip 1 -
Little and often is better than doing one hour once a week. These mini sequences will help you establish a short 10 minute yoga routine into your day.

Tip 2 - Try to commit to a 10 day run but if you don’t make it onto the mat don’t beat yourself up. It can sometimes take a bit of time to train your brain into this new healthy habit.

Tip 3 - You don’t need a sacred space to practice. Anywhere your mat fits is perfect – end of your bed, kitchen floor, sitting room.

Tip 4 - Try incorporating your home practice into your morning routine. I find getting on my mat before I start into anything else works best for me. With the best will in the world life can often take over and prevent you from getting onto your mat later in the day.

Tip 5 - If you are getting into the swing of it, repeat that day's mini sequence or add in a few more Sun Salutations. Stay within what feels comfortable to you to establish your mat as a supportive space to come back.

Tip 6 - Move slowly through your practice and enjoy being the boss. Get close to your breath, and take extra breaths in poses you are enjoying. Keep your transitions simple and when in doubt link pose through a Downward Dog or come back to Tadasana at the top of your mat and step back into your next pose.

Tip 7 - When you find a pose that really nourishes you, spend a bit more time in it or add it in throughout your practice even if it is not in that day's flow.

Tip 8 - You can repeat the sequences if there are ones that suit you better. It is more important to try to build a routine than to do something new everyday.

Tip 9 - From the get go embed Savasana into your practice. It is all too tempting to jump up and roll your mat away but I really believe no matter how short it is Savasana is where all you have done on your mat will translate into the benefits.

Tip 10 - Explore other ‘off the mat’ yoga lifestyle choices like mindfulness, conscious living, an eco challenge – embedding the concept of yoga into your whole life.

YOGARU_SSC.png

To save the images for personal use click and hold down the image until the ‘save image’ option appears; on Mac hold down ‘control’ and click the image to get the option box; on PC right click on the image to get the option box. Scroll down in the ‘option box’ and click ‘save image’.

Ruth Delahunty Yogaru

How can my practice help me today?

PAUSE_0128.png

BUILDING A RELATIONSHIP WITH YOUR MAT
In my recent article ‘10 Reasons to build a home practice’ I shared the benefits of stepping on your mat when it suits you, and practicing exactly what you need, as often as you like. In this article I use my own personal practice as a case study to show you how you can tailor your practice to your needs and get the most out of your time on your mat. You will find an accompanying tutorial for this article called ‘Tailoring your practice’ in my YouTube channel. If you’d like to download a fresh ‘Practice self inquiry’ and ‘The benefits of yoga’ go to ‘10 Reasons to build a home practice’.

When I started home practice I noticed the closer I got to my practice the better I became at tailoring to my ever changing needs. With time I learnt which poses to practice to support me with whatever I brought to my mat. My mat has become my comfort blanket that has seen me through over 20 years of life's ups and down and I hope it will continue to support me for many years to come. My relationship to my practice is a give and take relationship. If I don’t show up on my mat I don't get to experience the many benefits of yoga, if I push too hard I increase my chances of injury. I hope to help you establish your relationship to your practice, reap the fruit of your efforts and enjoy every minute.

HOW MY PRACTICE HELPED ME TODAY!
This is my self inquiry which I filled out at the start of this week. I used it to help me get the most of my time on my mat with more directed pose choices. Each day I step on my mat I check through the list to remind me what my focus for my practice was and revised ‘What is the rest of my day like?’ for each day. I usually review it at the start of each week and fill in another inquiry if other needs and issues arise. When I have the inquiry filled out I start to build a picture of which pose families will best suit me each day.

YOGARU_CS_Self inquiry.png

Here is the translation of my self inquiry into ‘pose families benefits’ from the benefits list below. I have highlighted:
Ease headaches - headache relief.
Eases stress & tension - overall muscle tension relief, stress relief, clenching jaw in sleep.
Builds strength - glutes, ankle.
Aids relaxation - mood balanced but teetering some days.

For my sequence I picked warm ups, standing poses, backbends, forward bends, twists, seated, gentle inversions and a restorative Savasana. I also picked a peak pose of Natarajasana/Lord of the Dance which is a standing, backbend pose. It will help open my chest, strengthen my glutes and ankles, and stretch my shoulders and hamstrings. It also deeply stretches the hip flexors which are a family of muscles deeply connected to the sympathetic nervous system (fight & flight response) addressing my underlying stress levels.

I go back to my list again to check that I addressed all my needs. My energy levels are not bad but because I have a busy day ahead I am going to practice gently and leave out arm balances which are a more strenuous family of poses. Seated poses are ticking lots of boxes for me at the moment so I will spend more time than usually in my seated poses and be sure to include some seated forward bends and seated twists to tick two families in one pose. I also remind myself of my two injuries that I need to consider throughout my practice.

YOGARU_CS_Benefits.png

PUTTING IT ALL TOGETHER
Below is the sequence which I created with an overlay of the pose family symbols and muscle group symbols. You will find the symbols guide in your 108 Asana deck or you can go to the asana section. This illustration gives you an ‘at a glance’ reason behind why each poses features in the sequence. Its important to note some of the multiple benefits are retrospective bonuses. There are many benefits to each pose. Poses you pick for one issue from your self inquiry will most likely address other issues too. For example I picked the last pose on the first row to prepare my quads and hip flexors for my peak pose, but you will see from the benefits list it will also help relieve stress and tension because it is a backbend.

PAUSE_0128_A.png

ALIGNMENT CUES
The peak pose for my practice at the moment is Natarajasana/Lord of the Dance. This sequence stretches you in all the right places and strengthens you in all the right places to prepare you for Natarajasana/Lord of the Dance. If this is a pose that you struggle to balance in stand by a wall for support. If you can’t quite reach the back leg you can use a belt to extend your reach.

Have a read of the tips below and either print out the sequence or save it onto your device:

  • From Tadasana, hands on hips, inhale, pour your weight into your left foot, bend your right leg back and lift your heel up towards your right buttocks.

  • Reach your right hand back and hold onto the outside of your right foot, lift your right foot up and back, press your foot into your hand and your hand against your foot, hips level and squared forward, right knee in line with right hip.

  • Extend your sternum forward and up, broaden through the collarbones, shoulders level.

  • Reach your left arm up high, press your thumb and forefinger together, gaze to the fingers of your left hand.

To save the images for personal use on your phone click and hold down the image until the ‘save image’ option appears; on Mac hold down ‘control’ and click the image to get the option box; on PC right click on the image to get the option box. Scroll down in the ‘option box’ and click ‘save image’.

Ruth Delahunty Yogaru

Yoga for self care

PAUSE_0124.png

PRIORITISING SELF CARE
We wear busyness like a badge of honour and looking after ourselves is often at the end of our ‘to do’ list. When I’m busy, self care is the first thing that gets dropped from my day, even though I know it is when I need it the most. Sometimes we need reminding how important self care and making a point of prioritising it is. If we put self care at the top of the list all the other jobs would be much easier – we would feel restored, cared for, content and ready for the rest of the day. Self care not only benefits us, it also benefits everyone we encounter throughout the day. Andrea Ferretti, host of the Yogaland Podcast defines self care as “the conscious act of taking care of your needs so that you can best serve your purpose in the world’. Life without self care is all outward energy without receiving anything back in return.

Do you have a self care routine? What does your self care routine look like for you? Write down a list of your go to self care tools. When you are like a hamster stuck in a wheel you will find it hard to remember what will help you. Work out what your obstacles to self care are to help you recognise them. You need a written message to your future self to remind you that you know exactly how to help yourself find balance again.

THE ROLE OF YOGA IN SELF CARE
Yoga is at the top of my list. It is the ultimate expression of self care, it helps you pause to check in with yourself and allows you to move in a way that will support you in your life off the mat. On the days I practice I notice my energy is better, my moods are more balanced, I am more focused and productive throughout the day and I sleep better. I look after myself and probably look after others better too! Yoga helps you sprinkle self care throughout your day, it reminds you that looking after yourself is an essential part of life, not a luxury.

HOW TO WORK OUT WHAT YOU NEED
Your yoga practice can help you take ownership of your wellness. Personal practice is where the magic happens. In your personal practice you are addressing your unique needs and tailoring to what you specifically need. When you step on your mat take a few moments to work out how your practice can help you today. Ask yourself these questions:

  • What do I need physically?

  • What do I need mentally?

  • What are my energy levels?

  • What is my mood today?

  • What are my limitations or injuries?

  • What is the rest of my day like?

  • Where do I need mobility?

  • Where do I need stability?

You may not have the answer to all the questions but it will help remind you if you have an injury you are minding, if you need to go easy because you have a full day ahead, or if you are dealing with something else in life that might require you to be extra kind to yourself.

When I practice I use one if my ready made sequences, or I go through the 108 Asana and either pick a peak pose that I’m curious to try and build a sequence, or pick a selection of poses at my level of experience.

EXPLORING YOGA FOR SELF CARE IN YOUR PRACTICE
Yoga works best when it is approached with a commitment to consistently getting on your mat, even if it is just for 10 minutes. You need to invest some time to get the wealth of benefits yoga gives in return. Everyone has different favourite poses and poses that suit them better than others. Consider this sequence is a starting point for building your self care flow. It is a gentle sequence full of nourishing poses that you can hold for a little bit longer and explore what your reactions to them are. Notice which poses you are enjoying and which challenge you physically and mentally. Start to build a picture of what your yoga practice looks like. Keep a note of poses that give you instant yoga good vibes.

ALIGNMENT CUES
Along the bottom of the sequence are a selection of ‘extra poses’ that you can slot in or substitute with other poses, so you can start to create your own unique flow tailored to your needs. You can also use these poses to create variety in your practice and continue to use this sequence for several practices.

Have a read of the tips below and either print out the sequence or save it onto your device:

  • Before you start to move, place one hand on your heart and one hand on your belly and take three gentle breaths to help you settle.

  • Remember to take time in each pose to notice your reaction to it and use a slow calm breath to find your stamina.

  • Consider adding Salabhasana/Locust at the end of each mini flow as a lovely way to strengthen and reset your spine.

  • If you are adding poses you can come into Downward Facing Dog/Adho Mukha Svanasana and then get ready to take your pose, or add them into their appropriate section ie Trikonasana into the end of one of the standing mini flows, Salamba Sarvangasana/Shoulderstand towards the end of the seated section.

  • Incorporate at least 2 minutes for Savasana at the end of your practice using a standard Savasana or the supported version in the extra poses section.

Subscribe to my newsletter & get a FREE YOGA BENEFITS INFOGRAPHIC as a thank you!

To save the images for personal use click and hold down the image until the ‘save image’ option appears; on Mac hold down ‘control’ and click the image to get the option box; on PC right click on the image to get the option box. Scroll down in the ‘option box’ and click ‘save image’.

Ruth Delahunty Yogaru