Anatomy 101

Anatomy 101 - 360 core

PAUSE_0063.png

THE ESSENTIAL CENTRE
The concept of ‘the core’ is a fascinating topic. If you peel away the idea of ‘core’ as a fashion item to be chased after, and look at it from a functional point of view you see it for what it actually is – an amazing anatomical feat of nature that plays a crucial role in physical and mental health. Just like an apple core, our core is the centre of our being – the powerhouse that gives stability to our spine, support to the organs, and mobility to the pelvis as a source of all movement.

HOW THE CORE WORK?
The core is intrinsically linked to the health of our spine. When the core is weak the back needs to work harder to hold us up and facilitate movement. When the core is tight or overworked it pulls the pelvis into a posterior backwards tilt and puts additional strain on the lumbar spine. To understand the core it is important to have a very simple understanding of the main muscle groups involved, and remembering the core does not just comprise of the ripped six pack summer holiday accessory, it wraps around to support you 360 degrees.

To break it down very simply – the transversus abdominis are the containment sheath that wrap around the core like a corset which support the organs and assist in posture; the internal and external obliques run diagonally up and down the side body and are mainly responsible for lateral side bends and twists; the rectus abdominis are the outermost layer of muscle and run from the pubis to the bottom of the sternum, they flex the spine and stabilise the pelvis; the quadratus lumborum do the opposite and extend the spine into backbends. The iliopsoas, which is considered ‘the core of the core’, is one of the biggest muscles of the body, and is responsible for hip flexion and movement. It is the only muscle that connect the upper and lower body, and is vital for all movement. The pelvic floor and the diaphragm are also considered crucial parts of the upper and lower core – making the core not only 360, but a full three dimensional top, bottom and sides shape.

EXPLORING THE CORE IN YOUR PRACTICE
What we are looking for in our practice is an evenly distributed strong and supple core that facilitates safe supported movement. The first step is to connect to the core, then work out what you need to do to engage the muscles, and in turn stabilise the spine and inner organs.

ALIGNMENT CUES
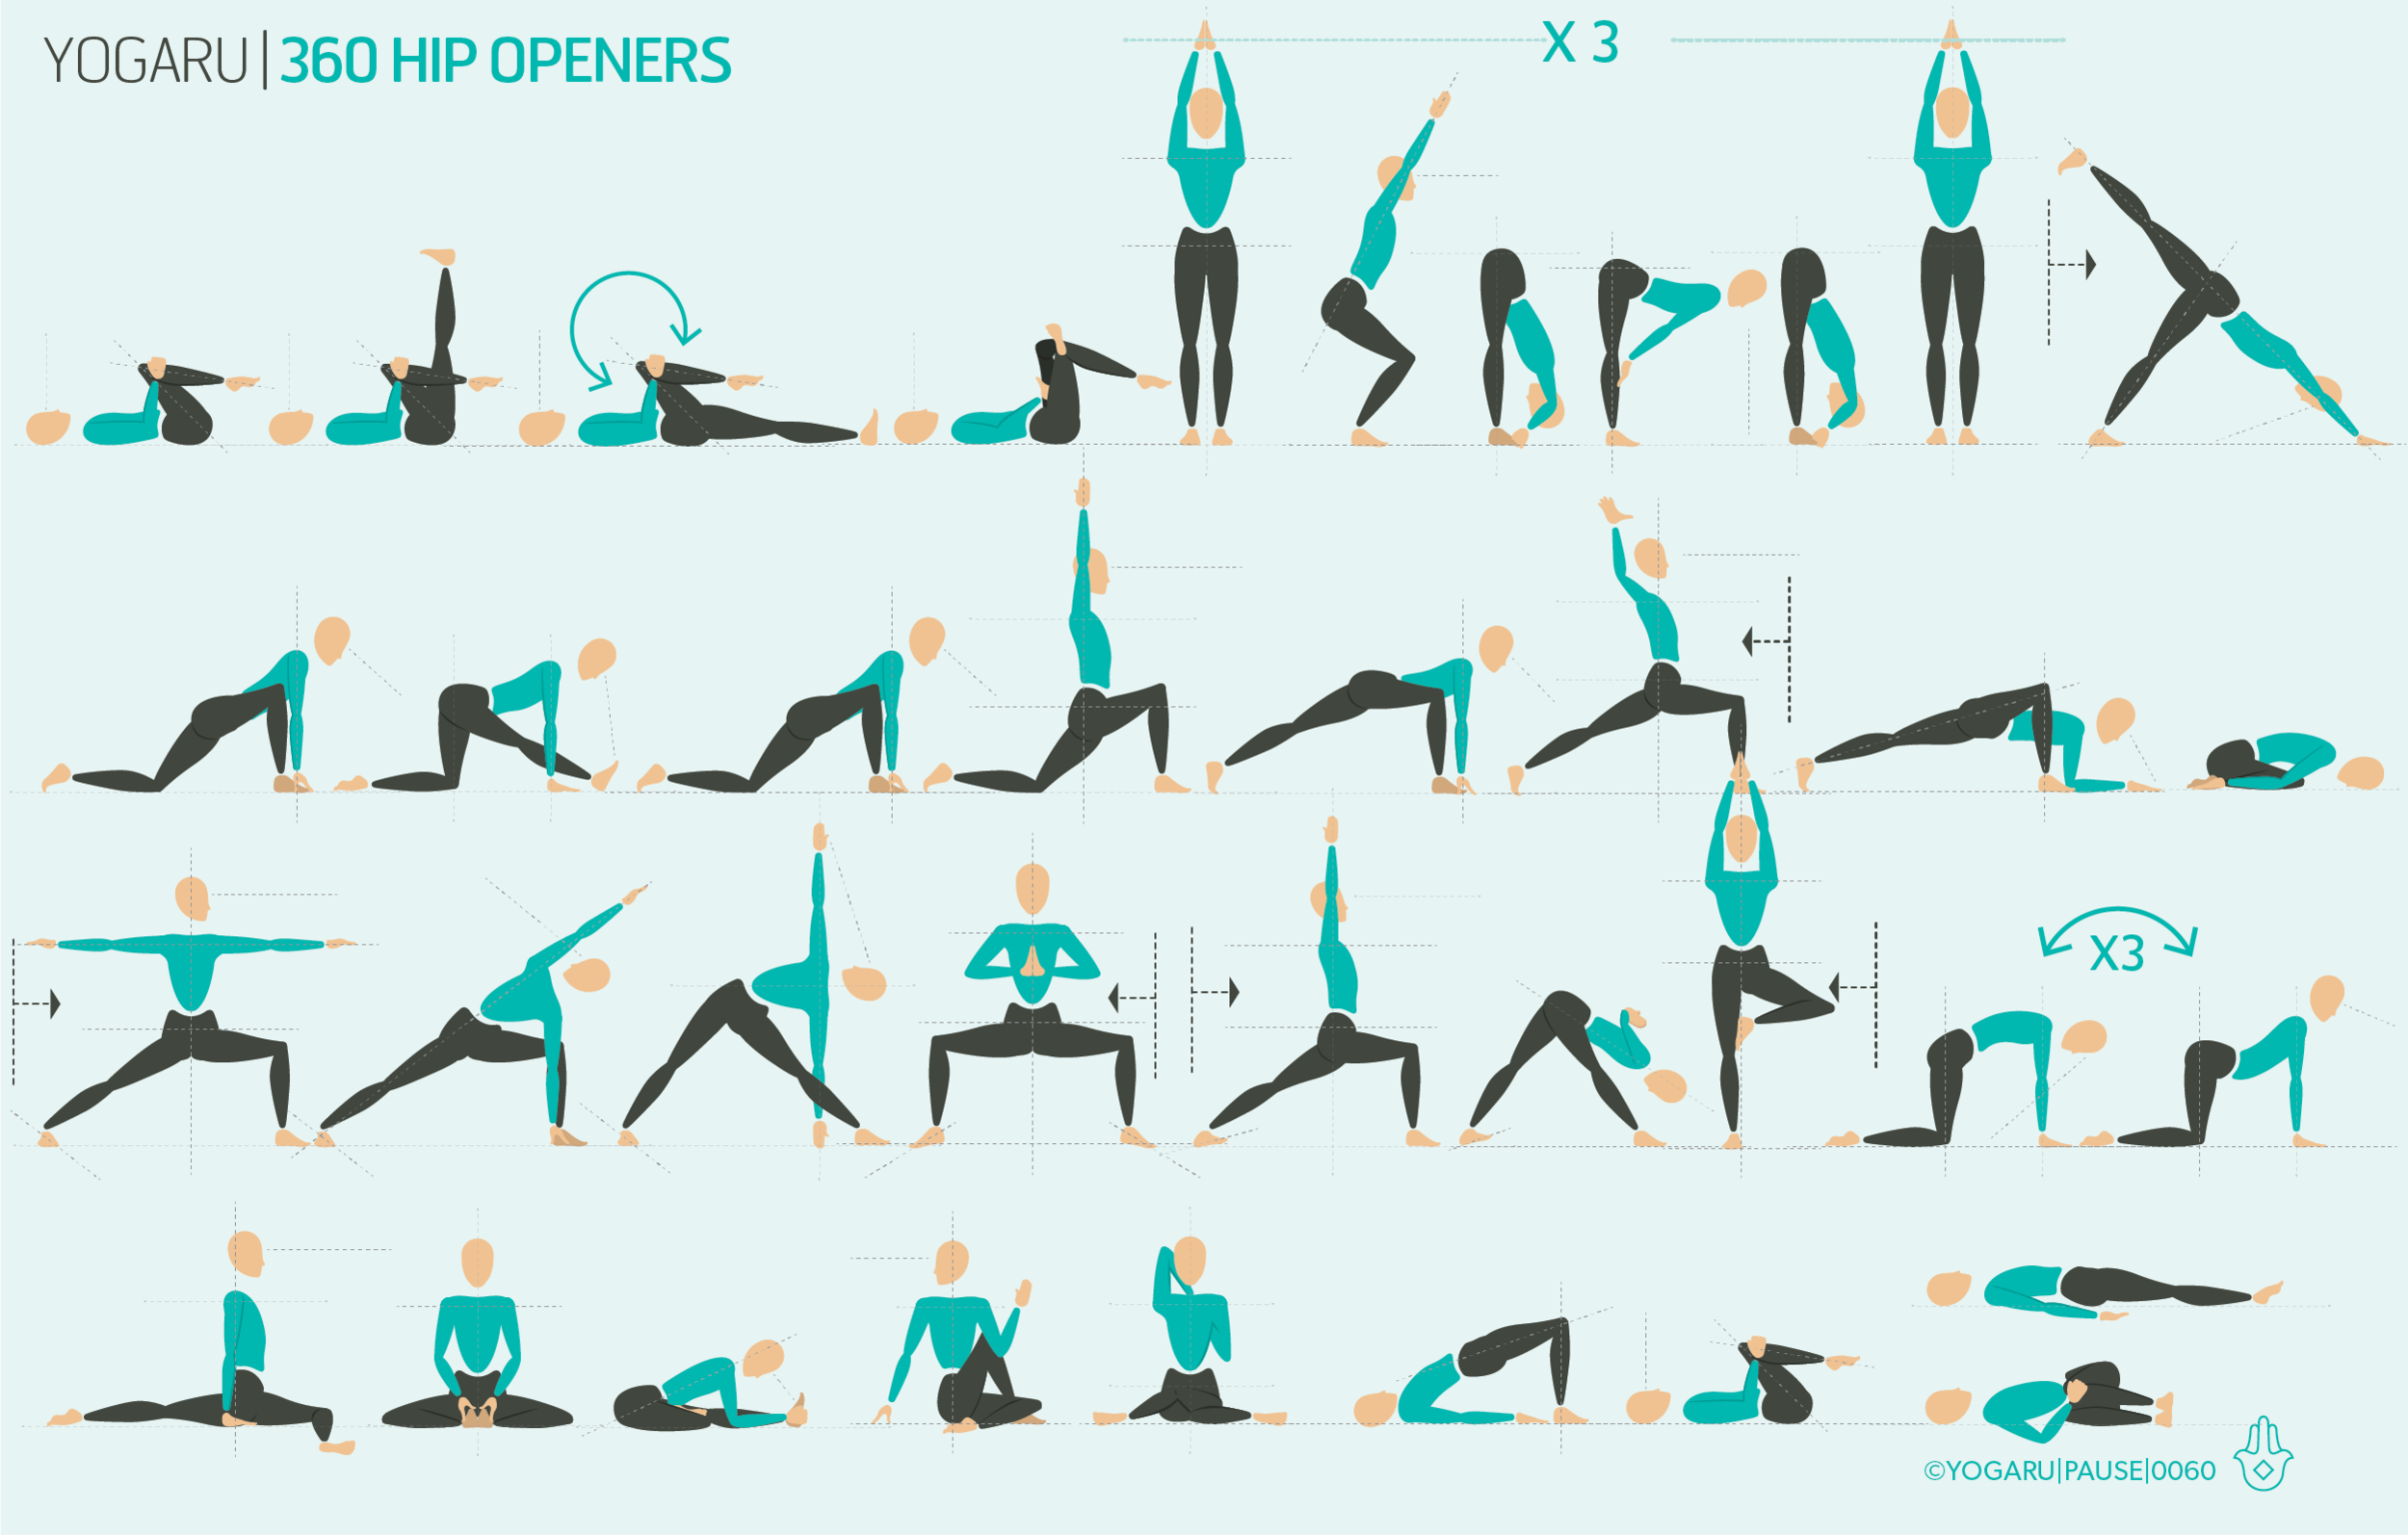
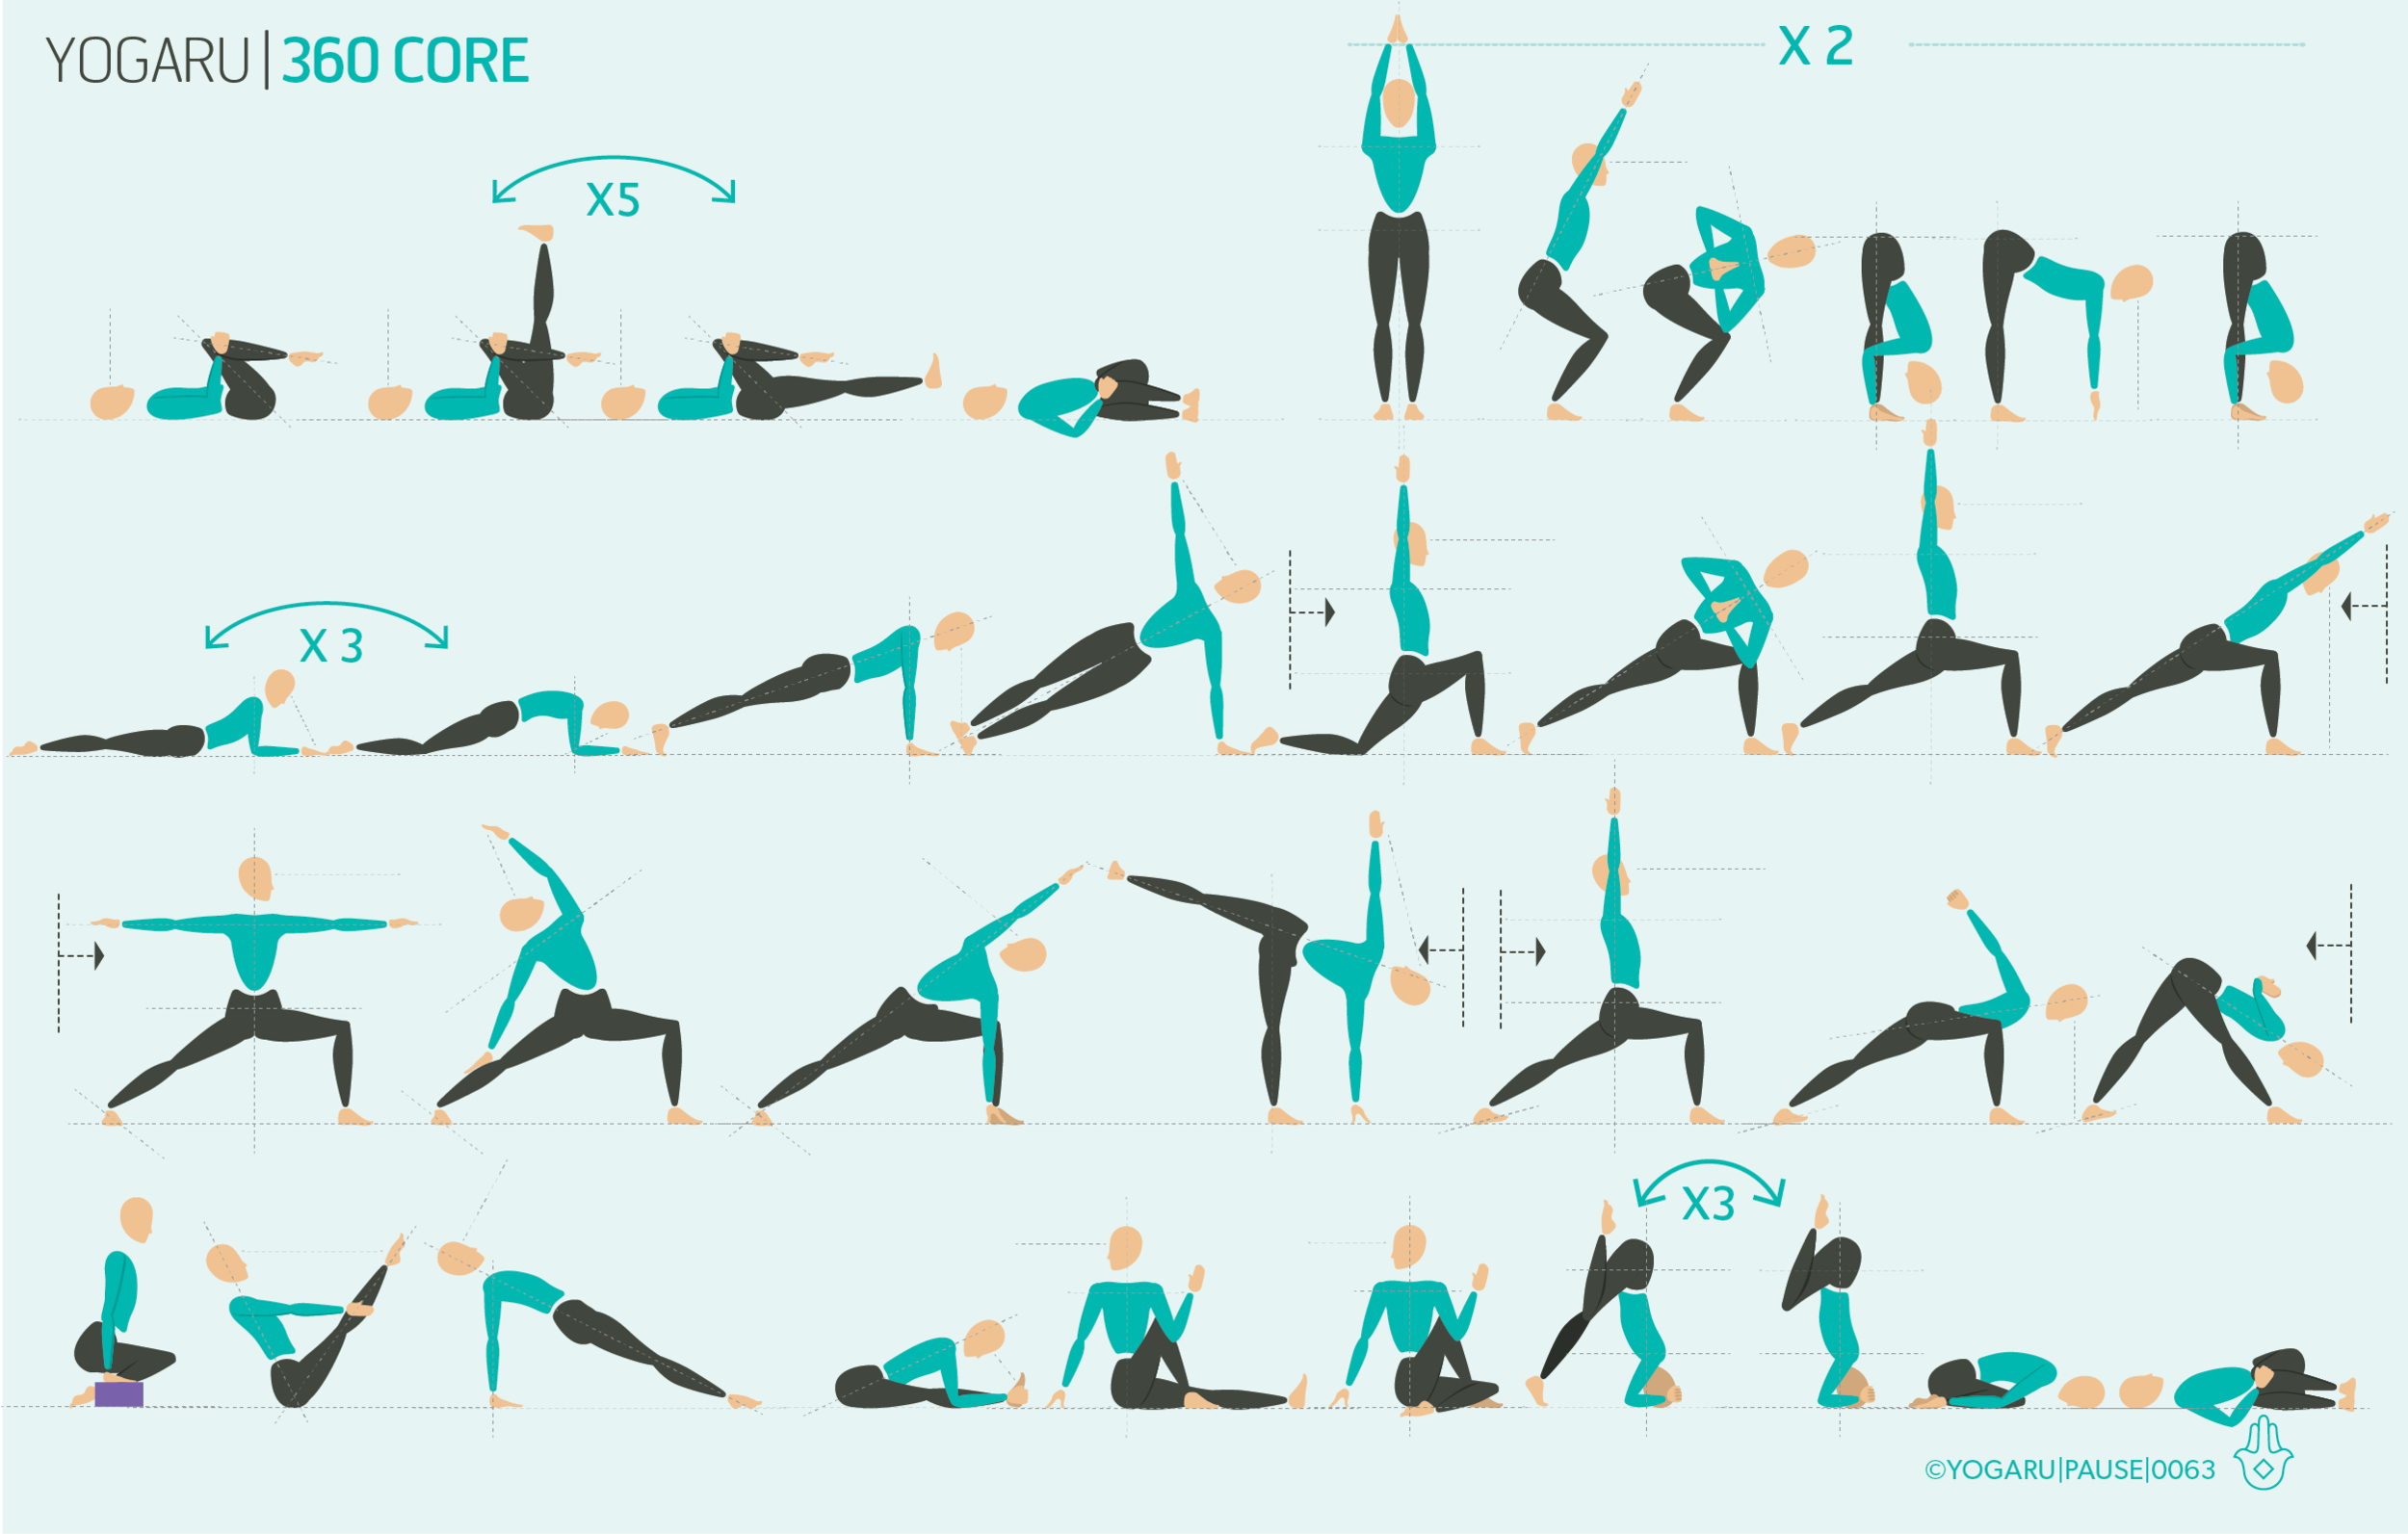
This sequence works the full range of the core. As you move through your practice consider the three steps of connect, engage and stabilise the core. The peak pose is Salamba Sirsasana/Headstand prep which requires strong core engagement and mobility.

Print out the below tips, along with the sequence, and explore the full spectrum of your core:

  • Set your yoga mat up short end to the wall. From all fours place your elbows down directly under your shoulders and interlace your fingers. Place your knuckles about an inch away from the wall.

  • Place the crown of your head on the ground using the interlaced fingers as a support wall. Lift your knees up and walk your toes in towards your elbows until you find the support of the wall against your back.

  • Press down into your forearms, lengthen up to your shoulders and hug your upper arms in. Lift your right leg up with a bent knee and draw it in to your chest. Squeeze into the back of your knee and reach your toes towards your buttocks.

  • Stack your hips over your shoulders and strongly draw your belly in towards your spine. On an exhale, slowly lift your left leg up with a bent knee and reach your toes towards your buttocks.

  • Keep your knees deeply bent and as slow as you can bring your feet back down onto the ground pausing at the point where you feel the work coming from your deep core muscles.

To save the images for personal use click and hold down the image until the ‘save image’ option appears; on Mac hold down ‘control’ and click the image to get the option box; on PC right click on the image to get the option box. Scroll down in the ‘option box’ and click ‘save image’.

Ruth Delahunty Yogaru

Anatomy 101 - 360 hips

PAUSE_0060.png

THE FEEL GOOD FACTOR
Hip openers definitely have a feel good factor. They release physical and emotional tension, relieve stress and anxiety, aid digestion, and enable freer mobility to everyday activities. Incorporating hip openers into your practice releases the muscles of the hips and help you with backbends, forward bends and inversions.

HOW DO THEY WORK?
Hip openers are one of the most requested poses in a yoga class, we’re all familiar with the effect they have on us physically and mentally, but what exactly is happening in the hips to produce this effect? One of the hip flexor muscles called the psoas muscle, which connect the upper and lower body, is one of the most important muscles for mobility and is linked to the ‘fight or flight’ response. Chronically tight psoas muscles, from prolonged periods of sitting, continuously triggers the stress hormone cortisol. When there is no fight or flight required the cortisol stays in our system and becomes surplus – keeping us in a permanent state of unrest, and leaves you feeling stressed, anxious and exhausted. Hip openers release this physical hip tension, and as a result stimulates the ‘rest, restore and digest’ response. Which is why you feel a lovely freedom of movement, along with a sense of calm, after incorporating some hip openers into your yoga practice.

BALANCING MISALIGNMENTS
The hip joint is a ball and socket joint which gives us a full 360 range of motion, along with internal rotation and external rotation. With such a range of motion comes a very complicated system of muscles to facilitate mobility and stability of the joint. When there is tightness in any of these muscles it can cause back and/or hip pain – for example tight hamstrings pull on the sit bones, tilting the pelvis back and cause the lower back to loose its natural lumbar curve and compress the vertebra of the spine. The hamstrings flex the knees and so shorten in extended periods of sitting, which is one of the main cause of lower back pain.

We all have a favoured side which can cause misalignment in the pelvis and spine. Misalignments pull on the opposing muscle – this also can cause back and/or hip pain. Hip openers help realign your posture and address these imbalances. Releasing the muscles of the hips and reestablishing the curve of the lower back are particularly good for those who suffer from mild to moderate back pain.

EXPLORING HIP OPENERS IN YOUR PRACTICE
The muscles of the hips are thick multi-layered muscles and need time and patience to release. Slow down and recognise when the muscles have reached their full range of motion. At first pull back 10 percent from your maximum and allow the muscle to get used to the idea of stretching. The sequence builds up to the ultimate hip opener Eka Pada Rajakapotasana/One Legged King Pigeon. Pigeon works on many of the hip muscles – it stretches the hip flexors on the back leg, and the inner groin and outer hip of the front bent leg. They help to regulate hormones and massage all the muscles of the upper body.

ALIGNMENT CUES
Move slowly through the above sequence and take extra time when you encounter tight areas. Take some deep breaths while the muscle gently warm up.

Print out the below tips, along with the sequence, and melt into your hip openers:

  • From Adho Mukha Svanasana, place your right foot behind your left hand and your right knee behind your right hand.

  • Right foot flexed, working towards your right shin being parallel to the top of the mat.

  • Place your hands either side of your hips, walk your left leg out behind you in line with your left hip as you lower your hips down.

  • Draw your left hip forward and your right hip back, let the weight of your upper body help to gently lower your hips down.

  • Stay here, or for a stronger stretch, exhale, fold forward, interlock your hands and place your head on your hands, gaze down.

  • ‘Proprioceptive Neuromuscular Facilitation’ or PNM contract and release to get a greater release similar to the stretch reflex.

  • Squeeze your outer hip muscles your glute to open the hip out.

  • Contract your muscles, draw your front knee back and your back knee forward. Lift your pelvic floor, draw navel to spine, hold for 6 seconds.

  • Exhale and release for 30 seconds.

To save the images for personal use click and hold down the image until the ‘save image’ option appears; on Mac hold down ‘control’ and click the image to get the option box; on PC right click on the image to get the option box. Scroll down in the ‘option box’ and click ‘save image’.

Ruth Delahunty Yogaru

Anatomy 101 - hypermobile joints

BALANCING FLEXIBILITY & STRENGTH
You see a lot of bendy elbows and knees in a typical yoga class. Flexible people tend to like yoga. We probably enjoy the fact that, in the beginning, we seem to be good at the physical aspect of it. There may be other factors to consider. Often, people who are less flexible think that they are at a disadvantage in a yoga class. How wrong they are!

Many people who seem to be very flexible (and plenty of people who don’t think of themselves as being flexible) have one or more hypermobile joint. A hypermobile joint moves beyond the normal range of motion. Knees turn inside out; elbows make strange angles when fully extended; thumbs bend to meet wrists; palms easily meet the floor in forward folds. For the majority of people, if you take care of your joints they won’t cause too many problems. Occasionally hypermobility can be more serious. Hypermobile joints are more susceptible to dislocate. Sometimes they can dislocate multiple times – then you really notice it.

POSES DON’T HAVE ALIGNMENT
Yoga is many things, one of which is a search for balance. In our asana practice, we balance right with left, effort with ease, and we aim to find a balance between strength and flexibility.

Recently, I read an article that quoted Leslie Kaminoff (Yoga Anatomy), as saying “poses don’t have alignment, people do”. Put simply, there is no perfect pose, there’s only the perfect pose for you. It follows that the alignment cues that are beneficial for one person may not be suitable for another. This is particularly relevant when it comes to yoga students who have one or more hypermobile joints.

HYPERMOBILITY IN YOUR PRACTICE
In the case of flexibility, you really can have too much of a good thing. Joints that are supported by strong muscles are less likely to be injured in sports and in yoga practice. Joints that move beyond the normal range of motion, and that aren’t supported by adequate muscle are much more likely to be injured.

In Tadasana/Mountain or Parsvottanasana/intense side stretch a micro bend at the knee can be helpful for lots of people, particularly those who have hypermobility in the knee joint. If your knee moves beyond the normal range of motion, a cue to straighten your leg might lead you to extend beyond straight. Instead, take a micro bend at the knee – a bend so slight that it is barely visible, but one that causes the muscles around your knee to engage and support the joint.

The same applies to the elbows in Vasisthasana/Side Plank. When weight is taken in the arms, a slight bend can help to activate the muscles that support the elbows so that the weight of the body isn’t “dumped” into the joints. In a pose like Vasisthasana/Side Plank, where you aim to balance on one hand, that tiny bend also makes it easier to soften the shoulder blade down the back into a safer position.  

In Adho Mukha Svanasana/Downward Facing Dog, we’re often instructed to melt the chest towards the thighs. If you have very mobile shoulders this cue might encourage you to drop low through your shoulders, putting an enormous amount of pressure into a joint, that is not terribly stable at the best of times. Instead, it can help to lift through the forearms as if pressing away through the front of the forearm, rotate the eyes of the elbows slightly towards each other and lift from the arm pits. With these slight adjustments, it becomes easier to support the shoulder joints with their muscles.

What is amazing is just how much difference these tiny bends and lifts make. Muscles that were rarely used are switched on and strength can be built. As a result, it often becomes easier to find a more comfortable and energised pose.

JOINT HYPERMOBILITY SYNDROME
Some of us bendy folk, myself included, have more than one hypermobile joint. In my case, after a period of ongoing pain and discomfort, I was diagnosed by a physiotherapist as having joint hypermobility syndrome. Several members of my family have it too.

In class I see a lot of people who have hypermobility in their joints, and some of them probably have joint hypermobility syndrome. Sometimes they don’t want to bend their knees or pull back from the full expression of the pose, to the gradual detriment of their joints.

I am particularly interested by the fact that many hypermobile people seem to find it difficult to stay still. There is a theory that we seek comfort from the feedback we get from a joint, and that people who have a hypermobility syndrome find it difficult to find that feedback – hence they want to stretch and lengthen their bodies, often moving more than other people do, in a search for comfort.

There are other symptoms associated with widespread joint hypermobility including – pain, anxiety, heart palpitations, an over active fight or flight response, feelings of faintness, sleeplessness and digestive problems similar to IBS. It’s a topic that has been widely studied within the medical community, and more is being learned all the time about hypermobility and conditions associated with it.

YOGA & HYPERMOBILITY
I've now come to believe that yoga classes see more than their fair share of flexible folk because yoga helps us to calm ourselves rather than because of any boost it might give to our egos. If we can resist using our practice to increase the flexibility in our bodies, and instead practice with care and kindness for our joints, with an awareness to muscle engagement, yoga can be the best medicine for the bendiest of bodies!

Click on this link if you’d like to learn more about hypermobility.


ANNA CLARKE
The majority of Anna’s weekly classes take place within the mental health departments of Dublin hospitals. In addition, Anna teaches pregnancy yoga and post-natal yoga (for mums with babies) at Init Yoga, Ringsend. She also regularly covers classes at The Yoga Room, Ballsbridge.

To contact Anna email annamclarke@gmail.com or find her on Facebook.